Showing posts with label use-wear-do. Show all posts

Tuesday, April 9, 2013

Ta-Da! Tuesday--Day Twenty (b): Surprise Dress

My second installment for this week's Ta-Da! Tuesday is a dress I made for Blue Eyes.  I made it to do the sew along for The Sew Off over at Nap Time Crafters.  The challenge was kids clothes and the rules allowed starting from a pattern or tutorial but needing to add your own creative spin to it.  I started with Simplicity 2464.  I had wanted to make it a hi-low skirt but the realities of how the pattern is constructed didn't fit in with the vision I had in my head.  Surprise, surprise.

I don't always use out-of-print patterns, I swear.
The pink fabrics came from my own stash, that had once belonged in my mother in law's stash.  I love free fabric.  The green trim fabric was an eyelet remnant I bought a few years ago, hoping to make something cute with the gorgeous embroidery at the bottom.  There was never enough yardage for anything I liked.  So I used it here.  The only difference in cutting out the pattern was adding some extra fabric to the bodice back to make it less open, and cutting the skirt front wider to accommodate what I wanted to do for the surprise part of the dress.
I didn't think about how thin the pink gingham fabric was.  If I were to do it over again I would have lined the yoke on the waist.  I was in a hurry.
Once the dress was all made up I tried it on Blue Eyes and found that the front ended up looking really, really low cut on her.  I added a fabric panel after the fact.  I meant to make the top of the panel go to the bottom of the green stripe rather than the top but didn't remember that as I was prepping it.  Then I was too lazy to make Blue Eyes come try it on before I sewed it in.  And I had her entertaining the baby.  I may or may not go back and change it.
Back view
Originally I wanted the bodice back completely closed.  Had I moved forward with that plan without thinking about it I would have ended up with a dress Blue Eyes couldn't get her head through.  No bueno.

Now comes the surprise part of the dress.  I added an under layer to the skirt with lots of sheer tricot ruffles.  I already had plenty on hand because I've made a few pettiskirts and had quite a bit left over.  I broke out my trusty(ish) ruffle foot and let it do the ruffling work for me.  On the wrong side of the over layer I added some rows of bias tape to make a casing for ribbon drawstrings to bring up bits of the skirt to show off the ruffle layer.  I'm pleased with the result.  It took quite a bit of figuring to get the hem right when you include the pink trim at the bottom and the fact that I wanted that part left separate from the drawstrings.  It was a bit of a headache but it all worked out.  The plaid pattern is busy enough that it hides to stitching lines beautifully.
My great fear was that I would attach all the ruffles and Blue Eyes would not want to show it off.  I needn't have worried.  She likes to wear it with the over layer down but gets a kick out of showing it off to people by saying, "Look under my dress!"  We'll work on a different choice of words.
Surprise!  There's a layer of pink and lavender ruffles.
The only thing I would change about what I did is to follow the pattern and sew the skirt to the bodice before sewing the side seams.  I had stopped paying attention to the directions by then and have never had a problem with attaching a skirt this way before.  The elastic pieces in the back and the trim on the front make that method a bad idea with this pattern.  It took me two hours to fix it when I saw what happened after I triumphantly pulled it off the machine and announced I was finished.  Boo.  But now it's right.  In the future I'm going to add butterflies to the ends of the drawstrings (this will further mask the drawstrings when the over skirt is extended) and to the bodice.  With Q-ball's birthday coming up I simply ran out of time.  Blue Eyes doesn't know the difference and is happy in her ignorance.  And so am I.

UPDATE:  My mother in law (the one who gave me the fabric) saw the dress and recognized the fabric.  When I told her she had given it to me she said she should give me more of her fabric to work with.  It's always a big win when the person who gave the fabric is happy and impressed with the finished product.  Even if it took several years to get around to using it.

Ta-Da Tuesday-Day Twenty (a): The Perfect Storm Dress

I've been salivating over this pattern for a long time.  The drape on the neck and the slightly-more-than-ordinary sleeves made me fall in love.  I'm a sucker for interesting sleeves and these ones weren't even too far off of standard.  I digress.  It's the blue one on the live model.
imagevia saranoemi.com
With Easter coming up I decided that I deserved a new dress, regardless of whether or not the number on the scale said it was time to reward myself.  I snagged this lovely pink crepe-y material from my mom's bin of pink and purple fabric.  I knew immediately that it would be perfect for this pattern.

I call it the perfect storm dress because everything about the fit that could have gone wrong, did.  And when I took pictures it was stormy outside.  So it works.  Anyway, I am not unaware of my fitting issues so I started out by making the necessary pattern adjustments before cutting.
Don't mind me.  I'm just being weird-waisted over here.
Then I tried on the dress and saw that it needed to go up in the shoulders, meaning I would need to cut it down under the arms and along the neckline.  Peachy.  That's my favorite thing in the world to do.  Just as an aside, there really need to be punctuation to indicate sarcasm.  Just sayin'.

On top of those adjustments I had a beast of a time getting the drape to work.  The piece that comes down in the center was a piece of cake, but the stuff on the right and left sides that attach at the shoulder were...troublesome.  In the fuzzy picture below you can see that it looks more like a floppy jacket than a fitted drape.  I was not going for the floppy jacket look.
My mom is also in the picture.  She's just standing behind me.  You can see her fuzzy arm over my elbow.
Trying to get the blasted drape to lay well was not an easy task.  I'm overly very precise in my cutting and matching and so I am still baffled as to how the drape could have so badly backfired.  I had to pull it in funny to get it to fit.  It originally went from the top of the shoulder down to the side seam under the arm and is supposed to fit into around the armhole.  To get it to cooperate the drape had to be pulled and resewn so that none of it went under the arm.  A little disappointing, but I got the tighter look I was going for.

I finished the hem of the dress the night before Easter.  When I put the dress on for church I discovered that the length had shortened up quite a bit.  I like my knees to be covered when I sit.  They weren't.  I spent the entire church meeting pulling on the hem and cursing myself for not double checking the fit on the length after pulling up the shoulders.  There was no question about adding length.  If I wanted to be comfortable in the dress it would need more length.  I did that by adding two layers of pleated extension.  I was trying to make it look like it was supposed to be there rather than an afterthought.  The two rows of pleats go in opposite directions to give it a more custom touch that I hoped would look more like ready to wear.
Not too shabby, though I still need to iron out the pin marks.
Then, to go along with the Sew-vivor theme of buttons, I added studs.  The original pattern uses studs and the site I went to in search of cool buttons also has a section with studs.  I count them as non-functional buttons.  They come from Hong Kong, making shipping slower and more expensive than I like.  But the design on the stud was so perfect I couldn't stop thinking about them.  I love them.
I love how the shape on the studs echo the design of the drape.
So I'm super pleased with the final results.  Everything fits where it should and I can now sit with my knees covered.  Woohoo!  

On another subject, have you noticed recently that pattern companies are posing their models in ridiculous and unflattering positions?  My favorite was the Sumo Squat while leaned up against a window.  Classy.  Here's my interpretation.
This totally makes you want to sew the pattern, doesn't it?
I also saw that the pattern company has chosen a new look for their models.  I know that some designers have their models wear the same makeup on the runway.  In this case it was a facial expression the model was wearing.  I call it the "Whaaa...?"  Seriously, look here to see what I mean.
Talking to my children helped me perfect the "Whaaa...?"
 Now that everything is where it needs to be I'm a fan of the dress.  Before...not so much.  But at least I love it now.  Ta da!

Monday, March 4, 2013

$0 Nursery Reveal

Because I never actually posted everything I did for the nursery all together, here it is!  I also discovered that there isn't a single before picture of the nursery.  Darn it!  Just imagine a bare room with completely white walls and that'll be about right.  Before I get to the pictures I will give a brief recap on why the nursery is what it is.  Or you can read about the different parts more in-depth by clicking on the links below.  I'll put the same links in the descriptions of the pieces.

Bedding fabric
Finished bedding
Valance
Paint (including a picture of uberpregnant me)
Diaper stacker

After!  Kind of anti-climactic without a before.
We moved into our new house two and a half months before I was due to have a baby.  I was so excited to have a place where I could design a nursery.  There were grand plans and a lot of excitement for a Star Wars nursery until I looked at our budget.  It turns out I had exactly $0 to spend on making a nursery.  I was heartbroken.  Free is not easily done when it comes to nurseries.  Then I decided to stop being heartbroken and be creative instead.  When life gives you lemons and all...  Anyway, I looked through my fabric stash (slim pickings) and then asked my mom and grandma if I could plunder their stashes.  They graciously agreed.  Between the three of us I found enough fabric to make a bedding set.  The trick was to design something I liked with the varying amounts of fabric I had.  Some of it was just leftovers from previous projects of my mom and grandma, which added to the challenge.  Game on.
Before cutting.  That blue is striped on the reverse.  I didn't think I'd use another print.
For the bedding I referenced the measurements from the crib set I'd made for my daughter, Blue Eyes (Simplicity 3795), with some measurements taken from the crib bedding in Amy Butler's Little Stitches for Little Ones.  Other than that the design is all mine.  The creativity is most often in the embellishment.  The addition of the darker yellow picots is really what made the set something I like to look at instead of something that I figure just has to be good enough.  They made me think both of jungle animal teeth and of a circus tent when placed against the blue fabric.  I love the look more than I ever thought I would when I was still sad I couldn't go with my original plan.
I also like the sliver of jungle fabric peeking out from between the skirt panels.
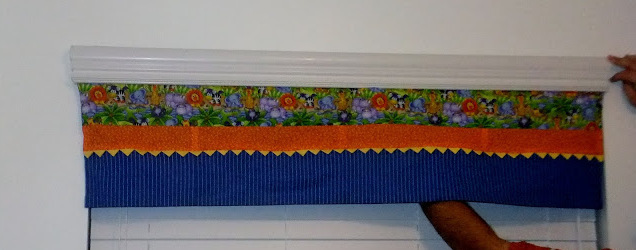
Next came the valance.  There was no hope of enough fabric for actual curtains and I even preferred the idea of a valance.  I repeated the bedding pattern with modifications (shorter fabric panels and smaller picots) to make it fit the size I wanted.
Look!  A white wall!  Does this count as my before picture?  Also, those strong and hairy arms belong to the Hubs, not me.
After the bedding and valance were done I went about painting the room.  I was owed a free can of paint and chose to get a color for the nursery.  It's a warm green rather than a cool green like a usually prefer but it goes with the bedding.  I really do like it a whole bunch.
The monkey blanket was a Christmas gift from my brother and his girlfriend.
The next addition to the room was not free, but it also did not come out of our family budget.  I did a little job for someone and used that money to pay for it all.  So that still fits the $0 budget, right?  Right?  I think so too.  Elephants on the Wall was featured on zulily.com and I snatched up this DIY mural for $40.  Most of the mural would have been covered up if I'd painted it around the door, so it went around the window with a minimum of effort in modification.  And I turned the leopard on the bottom right into a tiger to match the fabric.  That's about as artsy as I can manage.  The paints I used were 50% off at Walmart and I had fun matching the wall animals' colors to the ones on the fabric.  The mural took three days worth of my kids' nap time and after bed time to trace and paint.  It makes me smile.  I'll be doing one for the girls' room in a beach theme.
View from the hall
A bit closer
After Q-ball was born the only addition I made was making a couple of peepee teepees from fabric remnants for those pesky baby boy diaper changes.  He promptly stopped squirting at me as soon as I'd finished them.  I suppose it gave me the same result as if they'd actually been necessary.
The peepee teepee is that orange thing next to the lion.
For many months that was good enough.  I had cut out the body of a laundry bag, also from Little Stitches for Little Ones, and never finished it.  Too boring and by then I'd had the baby.  When I saw that this year's Sew-vivor competition was starting I decided I wanted to enter the nursery set.  It was missing something.  That something was the laundry bag that I really wished was a diaper stacker.  The less-than-plentiful fabric had already been cut so there was no going back to cut it differently.  I made it a diaper stacker anyway.  It just took a lot, LOT,  LOT of tweaking (mitered bottom, contrast fabric panels, picots, longer opening for diapers, ribbon ties rather than drawstring, and pattern modification to the monkey) to make it work how I wanted and to look interesting.  The result is priceless and finishes the room off rather nicely.

Just what this wall needed to give it extra life...and cover ink pen drawings on the change table, courtesy of the Pink Blur.
A monkey for my monkey

Fully stocked with 80 diapers in size 2
So here's the cost breakdown:

Furniture:  FREE from a family, friends, and our own collection
Paint:  FREE from Kwal
Picot and monkey body fabrics ribbon:  FREE from my stash
Animal prints and pale yellow fabric:  FREE from my mom's stash
Blue and orange fabrics:  FREE from my grandma's stash
Mural:  About $50 for mural and for paints

That's how my $0 nursery came to be.  Technically, there was a cost for the mural, but that money came separate from our family budget and I'm calling it good.  Either way, $50 is SUPER cheap for a complete nursery.  Success?  I think so.  Q-ball certainly likes it.  He's coming up on a year old now.  Time is cruel.

Saturday, March 2, 2013

Cheeky Monkey Diaper Stacker

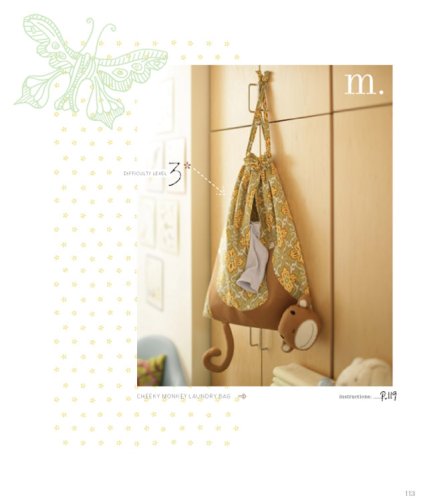
Original Cheeky Monkey Laundry Bag
image via Amazon
After almost a whole year I have finally gotten around to that final piece of the nursery that I've been meaning to finish.  Back when I was making everything for the $0 nursery I also cut out the pieces for the Cheeky Monkey Laundry Bag from Amy Butler's book Little Stitches for Little Ones.  I never got around to sewing it because I just didn't love it.  I cut out the main fabric (blue stripe) and lining fabric (pale yellow) and that was as far as it got.  Too boring.  There's not a whole lot of desire to finish the project when all there is to it is a simple lined bag.  I had no intention of adding the monkey.  At nine months pregnant one is allowed to decide she's not interested in doing something.  But with nothing to embellish the bag I didn't feel like getting around to it, even though I'd already cut out the pieces.  Besides, I didn't figure I would end up using a laundry bag.  And there's no good place to hang it in our nursery.

I saw a sewing competition and it gave me the inspiration I needed to finally get. this. project. finished.

I'm usually a plan-it-all-out-before-you-get-started kind of girl, but this project was one that evolved as I worked on it. The idea of a laundry bag just didn't appeal to me.  A diaper stacker DID appeal to me.  No, I don't know why, but I've always wanted one for my kids.  So the laundry bag project took its first turn into the diaper stacker project.

Flat bottom...very unlike my own round one  ;)
The biggest difference between the laundry bag and diaper stacker was that a diaper stacker has a flat bottom to accommodate the diapers.  Because of this critical difference, everything else had to change.  Also, my fabric was limited to what I had on hand and leftover from the original fabric.  To make the flat bottom I simply added a miter by folding the corners into a triangle and sewing a line to hold it down.  The seam line was five inches long.

I decided that the monkey really was a necessary part of the stacker.  I had lots of extra felt on hand and was excited to make the monkey match the fabric on the crib bedding.  No such luck.  My felt is in sheets and they were just too small to fit the monkey's body.  Strike one.

After realizing the felt wouldn't work I figured I could go to the fabric store and pick up some coordinating fabric to make the monkey.  No go.  The Pink Blur is in early potty training, so we aren't leaving the house much these days.  Strike two.  That left me with trying to use my other leftover crib fabric to make the monkey.  Only the pale yellow fabric had enough yardage and the blue fabric on the stacker would have shown through terribly.  Strike three and it's time for a new game.

My carpet is many things.  Vacuumed is not currently one of them.  Don't judge.
I rummaged through my fabric stash a bit more and found some green fabric in the shape of the state of Oklahoma.  There was so little there that I wondered why I'd ever kept in the first place.  Well, it worked.  Sort of.  With adjustments.  Monkey boy's body length was shortened by about three inches to make up for the mitered corner on the stacker, as well as to conserve fabric.  The arms were shortened about two inches each so all the pieces could fit.  The picture above shows how very close I was to not having sufficient fabric.  Yes, I did cut one of the head pieces poorly and have a chunk missing.  That's what the back of the head is for.  The contrast came from the pale yellow fabric.


Putting the monkey's body together was pretty easy.  The book suggested applying Wonder Under and ironing the body applique on before doing a satin stitch around the edge.  I had no Wonder Under and, again, Pink Blur is potty training, so no "quick" trip to pick some up.  I just tried to pin everything in place really well to avoid much fabric shifting.  That's not the easiest thing when the kids have hidden your pin cushion and you have a grand total of three pins to hold stuff in place.  But I digress.  If I'd had dry cleaning bags I could have used those in place of Wonder Under.  But no bags.  C'est la vie.

After the monkey's body was done I followed the instructions and embroidered the eyes, nostrils, and smile in place.  If I'd had fabric paint on hand I soooooo would have just painted those on.  I attached the head by machine rather than by adding velcro strips, as was suggested.  I don't plan on washing the diaper stacker like I would a laundry bag, thus eliminating the need for a removable head.

Fully stocked with size 2 Huggies, the stacker holds 80 diapers.  79...78...77...76...
The bag was still too plain and I was sort of grumpy about it until I realized that I probably had enough fabric left to repeat the design from the original nursery decor with picots and the strips of print fabric.  It happened, but only just barely.  I had to piece both the animal print and the orange print to get strips long enough to fit on top.  But don't you think it makes all the difference?  Now it's something I actually LIKE having up in the nursery.  Another point in its favor is that it hides the place where the Pink Blur likes to draw with an ink pen.
My middle child is an arTEEST.
Because I don't have anywhere good to actually hang the stacker I decided that short ties attached to the side of the change table would be better than a drawstring for me.  As I sat and dreaded making the straps (it was late and I was tired, but wanted to finish) I remembered that I had quite a bit of green ribbon in a bag.  Easy cheesy!  I edge stitched the top closed over those suckers, tied them on to the change table, and we were in business!  

I thought about changing the name of this project but "cheeky" seemed appropriate for a diaper stacker.
I am so pleased with how this turned out.  I like for everything I make to have a healthy chunk of my own creativity in it.  This does.  The original pattern was used for the monkey's head and tail and for the original dimensions of the bag.  My additions were the miter, contrast fabric strips, picots, monkey body modifications, ribbon tie rather than drawstring, and lengthening the opening for the diapers.  If I were to do it over again I would make the bag wider so I wouldn't have to fiddle with adjusting the monkey body to fit the miter and I would add some pockets on the front for a small wipes case and a tube of Desitin.  Hindsight is 20/20. But I love the addition to the room.  It's fun and cute.  And Q-ball loves playing with the monkey's tail while I change his diaper.  He won't stay on the change table anymore, so on the floor he goes!

Monday, November 5, 2012

Halloween 2012 Costumes


Insane.  Masochist. Glutton for punishment.  These all pretty much describe my feelings about myself after getting Halloween 2012 all finished.  It was a big year for homemade.  Everything except Hubs's costume was made by me.  And it was exhausting, but so worth it.  I always forget what a big production it is to make everyone a costume.  It only gets more hectic with more kids.  Not only does that add to number of costumes, but it takes away from the time available to actually, you know, MAKE them.  Everyone except me chose their own costume.  Well, Q-ball didn't get a choice.  The only choice a baby gets about a costume is whether to coo or cry.  He chose to coo.  What a good boy.  :)  I was still trying to do everything on the cheap and I think I did fairly well.

I made her put on a white tee so she'd be less naked.
This year became more of a challenge because my kids are starting to have an opinion.  I assumed the girls would want to be princesses.  I brought up patterns on the computer for Blue Eyes to look at so she could choose her princess.  Once she saw this Cleopatra costume she was totally smitten.  No other choice was acceptable.  She liked the "wings" on the dress.  I'm sure it was because it was the most difficult, most time-consuming, and least important part of the costume.  But I'm a loving mother and still made it.  The white fabrics came from my mom's fabric stash, and I purchased the black wig fabric, gold lame, and the jewels.  The jewels really made the costume.  How did I attach them?  I hot glued those bad boys on.

The Pink Blur was one I got lucky with.  She still wanted to be a princess.  At first she requested Cinderella.  I reminded her that she'd been Cinderella the year before.  Tangent:  She'd been Cinderella the previous year only because I'd run out of time to make the Snow White costume for which I'd purchased fabric, and we had Cinderella leftover from Blue Eyes's previous Halloween costume.  I gently directed her toward Snow White and she jumped on that.  Pink Blur was so excited to be her favorite Disney princess.  I was so excited that the fabric I'd purchased the year before had enough yardage to make a costume to fit her.  Hooray for free!  Free for this year, anyway.  I bought Snow White dress up shoes online for the costume.  The only size listed was 3 yrs + and I figured it would be okay if they were a touch too big.  Nope.  They were HUGE on Blue Eyes and her feet are bigger than the average 5 year old.  Maybe I'll have to make another one of these dresses in a few years.  Or not.

Know what happens when his older sisters take off the flying saucer and throw it off the back deck? Mommy searches fruitlessly for the ring and Q-ball becomes naked Shrek...with shiny boots.
I was so so so glad that little Q-ball was here for this Halloween.  His costume is one I'd had my eyes on for years, just waiting for a little boy so I could use it.  Turns out the pattern is out of print and I had to get it off eBay.  I'm not sorry.  I totally love it.  He is adorable as a little Martian.  I ended up buying everything needed for his costume.  Again, totally worth it.

Hubs is a Star Wars geek and went as Darth Maul.  He was scheduled for a raise so he went ahead and purchased his costume.  He also made most of the horns for the costume by carving them out of wood.  It was pretty awesome.  My contribution to his costume was the make up.  Easy cheesy, right?  Yeah.  I think it took over an hour and a half.  I was impressed with how long it lasted.  I'm also impressed that the Hubs left his bald cap on for over 12 hours.

After the neighborhood Trunk or Treat the kids were done.
My costume was a recycle because there simply wasn't time to put one together after I finished stuff for the kids.  I went as Arwen, same as I did five years ago.  There is a ton of satisfaction, however, in knowing that it was bigger on me this year than it was the first time I wore it.  Take that, weight loss!
I felt like I deserved something new after all the work I was doing for everyone else's costumes so I decided that if I didn't get a new costume that I should have elf ears.  I was so excited to open up my brand new pair of elf ears.  I was less excited when my "pair" of ear tips were both for left ears.  I was so tired by that point in the day that I almost cried right then.  Instead I bucked up, put on one ear, and draped my hair over the other ear.  They were non-refundable so I got half my money's worth.  Or something.  Next year, I get a new costume.

The kids all had a blast and got way more candy than necessary.  That's all part of the fun.
In the end it really was worth it because the girls loved their costumes and I loved Q-ball's.  Such fun.


Here's to a calmer Halloween next year!


Thursday, April 26, 2012

Glorious Green

The nursery project is still underway, though there are a couple of other things I've completed since my last posting.  I've been having too much fun with the baby.  Having a brood of three keeps me pretty busy, too.

The next change to the nursery was a pretty big one.  The walls are green now.  And I love them.  I was able to take my fabric to the paint store to find something that coordinates.  Thanks to a freak occurrence with our paint going bad during the home=building process, I was owed a free can of paint.  Woohoo!  That's a price I can afford.


I chose a green color that wouldn't be overwhelming.  I avoided yellow like the plague.  Several years ago I attended a teaching conference, including a class on color and how it affects people.  The presenter said that babies in yellow rooms tend to cry more.  Yeah, sign me up for that.  Sure.

Ever wondered what it looks like when a hippo paints a wall?  Now you know.
Even though I did paint prep on the houses we built and the Hubs did the painting on them, I still learned a lot from the process.  I learned things like using a paint roller rather than a sprayer still requires a bit more coverage with paper and tape than I thought.  There are still some spots of green on the ceiling I need to cover with white.  Speaking of green spots, it's always good to have a drop cloth, even if you don't think you need it.  There's a reason I had to buy Goo Gone for the carpet.  I also learned that it takes two coats of paint, even if you're sure you got plenty of paint on with the first coat.  Something else I should have known is that largely pregnant bodies take up quite a bit of space.  Did I back into a wet wall and leave a big fanny print in the paint?  Uh...no...of course not.  But don't ask the pants I was wearing.  They lie.


I am really happy with the finished product.  The color is both vibrant and inviting.  I'm super proud of the job I did, even if I do have touch ups to do on the ceiling.  There are tons of painting tips and tutorials to be found online.  If you want to tackle painting a room it's good to watch a lot of them...and actually use the tips.


The color I used was Lemon Thyme from Kwal.  It's a bit warmer color than I would usually choose but it goes with the nursery fabric.  Turns out that a gallon of paint was exactly how much I needed to get two coats of paint.  I have just enough left to do touch-ups.


This wall and the dresser need more work to make the space more visually appealing.  I'm trying to figure out what I can do with some art of pictures.  We'll see.  I do have one favorite addition to the nursery.  With this little guy in there how can anyone notice anything else?

Cute little man.  He makes me give out happy sighs.
If I get really ambitious I'll make some more things with the fabric I have. The plan is to do just that and keep the nursery free. However, I have already spent some money on it. The part that costs is something I haven't put up yet...

Saturday, March 31, 2012

Valance

There was more fabric leftover from the crib bedding than I anticipated.  Woohoo; bonus valance!  I liked the crib skirt so well that I decided I would use the same design for a valance.  There were just a couple of modifications I wanted to make.

Finished valance
First off was making the valance shorter and wider to get the look I wanted in the window.  I kept the orange strip at the same length as the bed skirt.  The animal print and the blue both got a couple of inches knocked off.   Then I had to accommodate the window width.  It's just under 48 inches wide.  I also thought I'd try smaller picots.  I'm not sure which one I prefer, but it doesn't matter because it's already made.  :)

The other, bigger problem was what to do with the valance in terms of how to use it with the plastic valance that came with our blinds.  A curtain rod would either cut off view of the plastic valance or not fit underneath it. Then I remembered that the plastic valance is, in fact, made with plastic (brilliant, no?).  A little hot glue would stick the fabric on well and not cause damage when I'm ready to take it down. Double score!
Marking center on both plastic and fabric valances

Once I put it up on the window it was clear that I had overlooked one very important part: lining.  It was really noticeable when I put it up and the light was shining through the seam allowances.  There are plenty of them because I was using remnants as much as possible, rather than cutting into the larger bits of fabric.  I had no desire to take down what I'd already glued on and decided to just glue the lining on to the valance.  Besides, hand stitching it on would have taken more time than I was willing to spend.  That plan would have worked well if I hadn't run out of glue sticks.  I have two glue guns, a standard size and a mini size.  I was only able to find the mini gun and the standard sticks.  The rest is somewhere in the pile of packed boxes in the basement.  Of course.  I did find some self-stick Velcro strips and felt pretty clever for using that to attach the lining to the back.  At least, I felt clever until it became apparent that the adhesive was designed to be just strong enough to hold the Velcro in place until it can be stitched down, which I hadn't planned to do.  In the end I hand stitched the lining while watching TV.  Is it just me, or does it seem like all my best laid plans for this nursery keep falling through?

The Hubs holding up the valance because I'm not ready to snap it back in place just yet.  He's a good helper.
Sorry for the flash on the picture.  I just really wanted to get this posted.  The seams still show up on the orange when using a flash.  Interesting.  Anyhow, next up in the great nursery transformation is a bit more color. :)  I have the feeling I'm going to love this.