Showing posts with label nursery. Show all posts

Monday, March 4, 2013

$0 Nursery Reveal

Because I never actually posted everything I did for the nursery all together, here it is!  I also discovered that there isn't a single before picture of the nursery.  Darn it!  Just imagine a bare room with completely white walls and that'll be about right.  Before I get to the pictures I will give a brief recap on why the nursery is what it is.  Or you can read about the different parts more in-depth by clicking on the links below.  I'll put the same links in the descriptions of the pieces.

Bedding fabric
Finished bedding
Valance
Paint (including a picture of uberpregnant me)
Diaper stacker

After!  Kind of anti-climactic without a before.
We moved into our new house two and a half months before I was due to have a baby.  I was so excited to have a place where I could design a nursery.  There were grand plans and a lot of excitement for a Star Wars nursery until I looked at our budget.  It turns out I had exactly $0 to spend on making a nursery.  I was heartbroken.  Free is not easily done when it comes to nurseries.  Then I decided to stop being heartbroken and be creative instead.  When life gives you lemons and all...  Anyway, I looked through my fabric stash (slim pickings) and then asked my mom and grandma if I could plunder their stashes.  They graciously agreed.  Between the three of us I found enough fabric to make a bedding set.  The trick was to design something I liked with the varying amounts of fabric I had.  Some of it was just leftovers from previous projects of my mom and grandma, which added to the challenge.  Game on.
Before cutting.  That blue is striped on the reverse.  I didn't think I'd use another print.
For the bedding I referenced the measurements from the crib set I'd made for my daughter, Blue Eyes (Simplicity 3795), with some measurements taken from the crib bedding in Amy Butler's Little Stitches for Little Ones.  Other than that the design is all mine.  The creativity is most often in the embellishment.  The addition of the darker yellow picots is really what made the set something I like to look at instead of something that I figure just has to be good enough.  They made me think both of jungle animal teeth and of a circus tent when placed against the blue fabric.  I love the look more than I ever thought I would when I was still sad I couldn't go with my original plan.
I also like the sliver of jungle fabric peeking out from between the skirt panels.
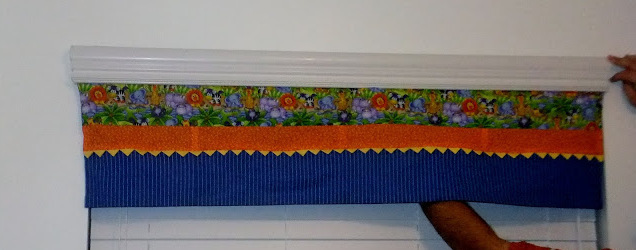
Next came the valance.  There was no hope of enough fabric for actual curtains and I even preferred the idea of a valance.  I repeated the bedding pattern with modifications (shorter fabric panels and smaller picots) to make it fit the size I wanted.
Look!  A white wall!  Does this count as my before picture?  Also, those strong and hairy arms belong to the Hubs, not me.
After the bedding and valance were done I went about painting the room.  I was owed a free can of paint and chose to get a color for the nursery.  It's a warm green rather than a cool green like a usually prefer but it goes with the bedding.  I really do like it a whole bunch.
The monkey blanket was a Christmas gift from my brother and his girlfriend.
The next addition to the room was not free, but it also did not come out of our family budget.  I did a little job for someone and used that money to pay for it all.  So that still fits the $0 budget, right?  Right?  I think so too.  Elephants on the Wall was featured on zulily.com and I snatched up this DIY mural for $40.  Most of the mural would have been covered up if I'd painted it around the door, so it went around the window with a minimum of effort in modification.  And I turned the leopard on the bottom right into a tiger to match the fabric.  That's about as artsy as I can manage.  The paints I used were 50% off at Walmart and I had fun matching the wall animals' colors to the ones on the fabric.  The mural took three days worth of my kids' nap time and after bed time to trace and paint.  It makes me smile.  I'll be doing one for the girls' room in a beach theme.
View from the hall
A bit closer
After Q-ball was born the only addition I made was making a couple of peepee teepees from fabric remnants for those pesky baby boy diaper changes.  He promptly stopped squirting at me as soon as I'd finished them.  I suppose it gave me the same result as if they'd actually been necessary.
The peepee teepee is that orange thing next to the lion.
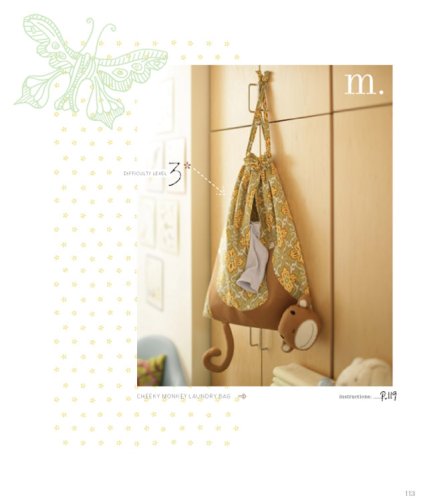
For many months that was good enough.  I had cut out the body of a laundry bag, also from Little Stitches for Little Ones, and never finished it.  Too boring and by then I'd had the baby.  When I saw that this year's Sew-vivor competition was starting I decided I wanted to enter the nursery set.  It was missing something.  That something was the laundry bag that I really wished was a diaper stacker.  The less-than-plentiful fabric had already been cut so there was no going back to cut it differently.  I made it a diaper stacker anyway.  It just took a lot, LOT,  LOT of tweaking (mitered bottom, contrast fabric panels, picots, longer opening for diapers, ribbon ties rather than drawstring, and pattern modification to the monkey) to make it work how I wanted and to look interesting.  The result is priceless and finishes the room off rather nicely.

Just what this wall needed to give it extra life...and cover ink pen drawings on the change table, courtesy of the Pink Blur.
A monkey for my monkey

Fully stocked with 80 diapers in size 2
So here's the cost breakdown:

Furniture:  FREE from a family, friends, and our own collection
Paint:  FREE from Kwal
Picot and monkey body fabrics ribbon:  FREE from my stash
Animal prints and pale yellow fabric:  FREE from my mom's stash
Blue and orange fabrics:  FREE from my grandma's stash
Mural:  About $50 for mural and for paints

That's how my $0 nursery came to be.  Technically, there was a cost for the mural, but that money came separate from our family budget and I'm calling it good.  Either way, $50 is SUPER cheap for a complete nursery.  Success?  I think so.  Q-ball certainly likes it.  He's coming up on a year old now.  Time is cruel.

Saturday, March 2, 2013

Cheeky Monkey Diaper Stacker

Original Cheeky Monkey Laundry Bag
image via Amazon
After almost a whole year I have finally gotten around to that final piece of the nursery that I've been meaning to finish.  Back when I was making everything for the $0 nursery I also cut out the pieces for the Cheeky Monkey Laundry Bag from Amy Butler's book Little Stitches for Little Ones.  I never got around to sewing it because I just didn't love it.  I cut out the main fabric (blue stripe) and lining fabric (pale yellow) and that was as far as it got.  Too boring.  There's not a whole lot of desire to finish the project when all there is to it is a simple lined bag.  I had no intention of adding the monkey.  At nine months pregnant one is allowed to decide she's not interested in doing something.  But with nothing to embellish the bag I didn't feel like getting around to it, even though I'd already cut out the pieces.  Besides, I didn't figure I would end up using a laundry bag.  And there's no good place to hang it in our nursery.

I saw a sewing competition and it gave me the inspiration I needed to finally get. this. project. finished.

I'm usually a plan-it-all-out-before-you-get-started kind of girl, but this project was one that evolved as I worked on it. The idea of a laundry bag just didn't appeal to me.  A diaper stacker DID appeal to me.  No, I don't know why, but I've always wanted one for my kids.  So the laundry bag project took its first turn into the diaper stacker project.

Flat bottom...very unlike my own round one  ;)
The biggest difference between the laundry bag and diaper stacker was that a diaper stacker has a flat bottom to accommodate the diapers.  Because of this critical difference, everything else had to change.  Also, my fabric was limited to what I had on hand and leftover from the original fabric.  To make the flat bottom I simply added a miter by folding the corners into a triangle and sewing a line to hold it down.  The seam line was five inches long.

I decided that the monkey really was a necessary part of the stacker.  I had lots of extra felt on hand and was excited to make the monkey match the fabric on the crib bedding.  No such luck.  My felt is in sheets and they were just too small to fit the monkey's body.  Strike one.

After realizing the felt wouldn't work I figured I could go to the fabric store and pick up some coordinating fabric to make the monkey.  No go.  The Pink Blur is in early potty training, so we aren't leaving the house much these days.  Strike two.  That left me with trying to use my other leftover crib fabric to make the monkey.  Only the pale yellow fabric had enough yardage and the blue fabric on the stacker would have shown through terribly.  Strike three and it's time for a new game.

My carpet is many things.  Vacuumed is not currently one of them.  Don't judge.
I rummaged through my fabric stash a bit more and found some green fabric in the shape of the state of Oklahoma.  There was so little there that I wondered why I'd ever kept in the first place.  Well, it worked.  Sort of.  With adjustments.  Monkey boy's body length was shortened by about three inches to make up for the mitered corner on the stacker, as well as to conserve fabric.  The arms were shortened about two inches each so all the pieces could fit.  The picture above shows how very close I was to not having sufficient fabric.  Yes, I did cut one of the head pieces poorly and have a chunk missing.  That's what the back of the head is for.  The contrast came from the pale yellow fabric.


Putting the monkey's body together was pretty easy.  The book suggested applying Wonder Under and ironing the body applique on before doing a satin stitch around the edge.  I had no Wonder Under and, again, Pink Blur is potty training, so no "quick" trip to pick some up.  I just tried to pin everything in place really well to avoid much fabric shifting.  That's not the easiest thing when the kids have hidden your pin cushion and you have a grand total of three pins to hold stuff in place.  But I digress.  If I'd had dry cleaning bags I could have used those in place of Wonder Under.  But no bags.  C'est la vie.

After the monkey's body was done I followed the instructions and embroidered the eyes, nostrils, and smile in place.  If I'd had fabric paint on hand I soooooo would have just painted those on.  I attached the head by machine rather than by adding velcro strips, as was suggested.  I don't plan on washing the diaper stacker like I would a laundry bag, thus eliminating the need for a removable head.

Fully stocked with size 2 Huggies, the stacker holds 80 diapers.  79...78...77...76...
The bag was still too plain and I was sort of grumpy about it until I realized that I probably had enough fabric left to repeat the design from the original nursery decor with picots and the strips of print fabric.  It happened, but only just barely.  I had to piece both the animal print and the orange print to get strips long enough to fit on top.  But don't you think it makes all the difference?  Now it's something I actually LIKE having up in the nursery.  Another point in its favor is that it hides the place where the Pink Blur likes to draw with an ink pen.
My middle child is an arTEEST.
Because I don't have anywhere good to actually hang the stacker I decided that short ties attached to the side of the change table would be better than a drawstring for me.  As I sat and dreaded making the straps (it was late and I was tired, but wanted to finish) I remembered that I had quite a bit of green ribbon in a bag.  Easy cheesy!  I edge stitched the top closed over those suckers, tied them on to the change table, and we were in business!  

I thought about changing the name of this project but "cheeky" seemed appropriate for a diaper stacker.
I am so pleased with how this turned out.  I like for everything I make to have a healthy chunk of my own creativity in it.  This does.  The original pattern was used for the monkey's head and tail and for the original dimensions of the bag.  My additions were the miter, contrast fabric strips, picots, monkey body modifications, ribbon tie rather than drawstring, and lengthening the opening for the diapers.  If I were to do it over again I would make the bag wider so I wouldn't have to fiddle with adjusting the monkey body to fit the miter and I would add some pockets on the front for a small wipes case and a tube of Desitin.  Hindsight is 20/20. But I love the addition to the room.  It's fun and cute.  And Q-ball loves playing with the monkey's tail while I change his diaper.  He won't stay on the change table anymore, so on the floor he goes!

Thursday, April 26, 2012

Glorious Green

The nursery project is still underway, though there are a couple of other things I've completed since my last posting.  I've been having too much fun with the baby.  Having a brood of three keeps me pretty busy, too.

The next change to the nursery was a pretty big one.  The walls are green now.  And I love them.  I was able to take my fabric to the paint store to find something that coordinates.  Thanks to a freak occurrence with our paint going bad during the home=building process, I was owed a free can of paint.  Woohoo!  That's a price I can afford.


I chose a green color that wouldn't be overwhelming.  I avoided yellow like the plague.  Several years ago I attended a teaching conference, including a class on color and how it affects people.  The presenter said that babies in yellow rooms tend to cry more.  Yeah, sign me up for that.  Sure.

Ever wondered what it looks like when a hippo paints a wall?  Now you know.
Even though I did paint prep on the houses we built and the Hubs did the painting on them, I still learned a lot from the process.  I learned things like using a paint roller rather than a sprayer still requires a bit more coverage with paper and tape than I thought.  There are still some spots of green on the ceiling I need to cover with white.  Speaking of green spots, it's always good to have a drop cloth, even if you don't think you need it.  There's a reason I had to buy Goo Gone for the carpet.  I also learned that it takes two coats of paint, even if you're sure you got plenty of paint on with the first coat.  Something else I should have known is that largely pregnant bodies take up quite a bit of space.  Did I back into a wet wall and leave a big fanny print in the paint?  Uh...no...of course not.  But don't ask the pants I was wearing.  They lie.


I am really happy with the finished product.  The color is both vibrant and inviting.  I'm super proud of the job I did, even if I do have touch ups to do on the ceiling.  There are tons of painting tips and tutorials to be found online.  If you want to tackle painting a room it's good to watch a lot of them...and actually use the tips.


The color I used was Lemon Thyme from Kwal.  It's a bit warmer color than I would usually choose but it goes with the nursery fabric.  Turns out that a gallon of paint was exactly how much I needed to get two coats of paint.  I have just enough left to do touch-ups.


This wall and the dresser need more work to make the space more visually appealing.  I'm trying to figure out what I can do with some art of pictures.  We'll see.  I do have one favorite addition to the nursery.  With this little guy in there how can anyone notice anything else?

Cute little man.  He makes me give out happy sighs.
If I get really ambitious I'll make some more things with the fabric I have. The plan is to do just that and keep the nursery free. However, I have already spent some money on it. The part that costs is something I haven't put up yet...

Saturday, March 31, 2012

Valance

There was more fabric leftover from the crib bedding than I anticipated.  Woohoo; bonus valance!  I liked the crib skirt so well that I decided I would use the same design for a valance.  There were just a couple of modifications I wanted to make.

Finished valance
First off was making the valance shorter and wider to get the look I wanted in the window.  I kept the orange strip at the same length as the bed skirt.  The animal print and the blue both got a couple of inches knocked off.   Then I had to accommodate the window width.  It's just under 48 inches wide.  I also thought I'd try smaller picots.  I'm not sure which one I prefer, but it doesn't matter because it's already made.  :)

The other, bigger problem was what to do with the valance in terms of how to use it with the plastic valance that came with our blinds.  A curtain rod would either cut off view of the plastic valance or not fit underneath it. Then I remembered that the plastic valance is, in fact, made with plastic (brilliant, no?).  A little hot glue would stick the fabric on well and not cause damage when I'm ready to take it down. Double score!
Marking center on both plastic and fabric valances

Once I put it up on the window it was clear that I had overlooked one very important part: lining.  It was really noticeable when I put it up and the light was shining through the seam allowances.  There are plenty of them because I was using remnants as much as possible, rather than cutting into the larger bits of fabric.  I had no desire to take down what I'd already glued on and decided to just glue the lining on to the valance.  Besides, hand stitching it on would have taken more time than I was willing to spend.  That plan would have worked well if I hadn't run out of glue sticks.  I have two glue guns, a standard size and a mini size.  I was only able to find the mini gun and the standard sticks.  The rest is somewhere in the pile of packed boxes in the basement.  Of course.  I did find some self-stick Velcro strips and felt pretty clever for using that to attach the lining to the back.  At least, I felt clever until it became apparent that the adhesive was designed to be just strong enough to hold the Velcro in place until it can be stitched down, which I hadn't planned to do.  In the end I hand stitched the lining while watching TV.  Is it just me, or does it seem like all my best laid plans for this nursery keep falling through?

The Hubs holding up the valance because I'm not ready to snap it back in place just yet.  He's a good helper.
Sorry for the flash on the picture.  I just really wanted to get this posted.  The seams still show up on the orange when using a flash.  Interesting.  Anyhow, next up in the great nursery transformation is a bit more color. :)  I have the feeling I'm going to love this.

Tuesday, March 27, 2012

Crib Bedding


I finished the crib bedding today.  Yeehaw!  (I just moved into a rural area so I've got to get used to speaking like the natives, right?)  The crib sheet and skirt are all done and even placed in the crib.  Maybe that shouldn't make me overly proud, but I'll take any accomplishment I can get when I'm as roundly pregnant as I am at the moment.

Picture from sewingreview.pattern.com
I'm extra pleased that they fit into my $0 budget for the nursery.  There's still more I want to make (curtain, diaper stacker, possibly cover a lampshade, etc.) but I'm happy to have the essentials done.  All he really needs is the sheet to sleep on so I'm doing well to also have the skirt done.

For the  bedding pattern I kind of merged the one I used for my daughter (Simplicity 3795) with the one from Amy Butler's book Little Stitches for Little Ones.  (follow the link and if you click on "First Pages" after you click on Look Inside! and continue clicking through you'll find a picture of the set.  Sorry, that's the best I can do for a picture)  From Amy Butler I used the basic measurements for the sheet and crib skirt sizes, as well as using panels rather than large pleats.  From the Simplicity pattern I used width measurements for the three different  fabrics to be used for the crib skirt.  I'm completely skipping out on the bumpers pads because 1) they were more trouble than they're worth last time around, 2) darling as they are, SIDS stats are increased with using them, and 3) my second daughter slept with her face pressed into her crib bumper and we ended up just taking it out of the crib, anyway.

The big challenge with the crib sheet was lack of yardage.  I wanted to use the print with larger animals but there simply wasn't enough yardage (or was it width?).  Instead of deciding which other fabric I wanted to use I just took the measurements for side panels straight from the book and made them from the coordinating yellow fabric.  I thought I was brilliant until I saw that there are companies selling crib sheets this way so parents can avoid putting bumpers in the crib.  Ah, well.

My big surprise came as I was deciding which fabric to use on the crib skirt.  The surprise was the choice to use the printed side of the blue fabric.  I'm not usually a fan of mixing lots of prints, but it just looked a whole lot better to use the printed side.  So I did.
See?  Much better.
The next problem (in my mind) was that I wanted a little more embellishment for the crib skirt.  To me that is the show piece of a bedding set, particularly when bumpers aren't being used.  But embellishment would mean I'd have to spend money.  Dang it.  I decided to bite the bullet and purchase some jumbo rick-rack when I got my little stroke of brilliance.  The darker yellow color I had from leftovers didn't have a lot of yardage, but you don't need a lot to make picots.  I love picots and knew they would make a great addition...especially without needing to purchase anything.

Someday I will learn to take good pictures that all have the same light.
Just a little embellishment can take a project from kinda-cute to darling.  I'm really a fan of the picot trim.  I also like that it feels bolder and more masculine than rick-rack.  But that's just me.  I hated myself for choosing to make picots while I was in the process of cutting, pressing and sewing them.  However, as is my usual, once I got them on the crib skirt I was happy I'd done it.

Finished product being stepped on by daughter #2, aka The Pink Blur
Once I put the crib skirt on the I realized that most of the picots are covered by the bar across the bottom.  Bother.  One would think I might have planned for that.  I blame pregnant brain.  At least it should fix itself when we drop the mattress down to the next height.

I'll clean out under there before baby is born...maybe.
If I feel really ambitious I could make little animals to attach to the crib rails in place of the flowers on the pattern I used before.  I certainly remember making all those flowers.  Oh, so very many flowers.  I think making those was enough to give me arthritis all by itself.  But they were charming and I wasn't sorry.

Overall, this project isn't as scary or irritating when the bumpers are left out.  I highly recommend skipping them for the sake of your sanity.  I have other pictures and things to use for a tutorial if anyone is interested.

Thursday, March 22, 2012

"Beg, Borrow, and Steal" or "Making a Free Nursery"

There were a few things I learned in my brief stint as a teacher.  Okay, there were a LOT of things I learned.  One of them was what I call the Teachers' Creed.  You might think it has something to do with ensuring every child has a quality, educational experience in the classroom.  While that is every teacher's goal, that's not the one I'm talking about.  I'm talking about "Beg, borrow, and steal.  Don't reinvent the wheel."  This has to do with maintaining your own sanity by using others' ideas and making them your own to work with your students. You don't need to create everything yourself.  Ask for help.  I put that principle to good use when gathering the fabrics for the nursery bedding.

My original idea for the nursery would have included buying everything new...and probably not sewing the bedding.  I did that for my first daughter and swore I'd never do it again.  Too much work.  Having more time than money changes that up.  Because I'm going for a $0 budget to make this nursery I have no choice but to use what I can get my hands on for free.  Beg, borrow, and steal, right?  Note: Don't really steal.  It's wrong and bad and I don't actually do it. I don't have a big fabric stash (all mismatched knits) so I had to turn to my mom and ask if I could raid hers.  She has way more than I do.  My mom had actually purchased some fabric for me to use for my oldest daughter's crib bedding.  I had already purchased all my fabric for that project.  While a jungle theme wasn't really what I had ever planned on doing for a nursery, the price was right, there was enough yardage, and the fabric was cute enough.  The two jungle prints and the lighter yellow came from my mom's fabric boxes.  I wanted a little more variety, so I called my grandma and asked to go through her stash.  The orange print and the blue solid came from her house.  The darker yellow on top is leftovers I found at my house, but I doubt I'll be able to use it because there's so little of it.

The next problem was a crib.  We bough convertible cribs for the others to grow up with.  Then we only need to buy mattresses.  We're too poor to buy a crib right now.  We put our oldest in a big girl bed (with a mattress set my parents no longer need), our second in the toddler bed that our oldest used to use, and planned to put the baby in the crib from our second.  That idea worked well enough.  Then I saw someone post on Facebook that they had a crib (in need of repair) to give away.  I took it.

It requires a bit more repair than I feel comfortable putting a baby in after I'm done, so it's back to square one.  But don't think I haven't got a plan for that little crib.

The great thing about telling people you're looking for free or cheap nursery stuff is that it gets it on their radar, too.  Last week I got a call from my mom asking me if I wanted a gently used crib.  It was used for sleepovers at a grandma's house.  I quickly said yes.
Yes, the nursery is currently serving as the catch-all room.  You know you've done it too.
So now everyone has their own bed again.  The crib sheet above is one I made for my oldest daughter.  You can see why I'm not excited to put my little boy in it.  Anyway, we'll just have to buy this kiddo a convertible bed when he's older and we can (hopefully) afford it.  I'm so excited to see how the nursery comes together!  Oh, yeah...I like the price, too.