Sunday, April 28, 2013

Eyelet Shirt and Contest Entry

I've been a busy little sewing bee recently trying to get everything done for sew alongs, the Pantone Color Contest (don't forget to vote!), and testing a pattern for Peek-a-Boo Pattern Shop.  Add to those things that my machine DIED on me while I was altering the purple pants. Booooo!  I had to borrow my mom's machine so I can finish everything up.  All that's left now is a hem and a buttonhole for the pattern test and I can give it back and try to fix my own.

Now that I'm done moaning, I proudly present my latest project, the yellow eyelet shirt.
The color in this picture is not true to life.  The pictures further down are much more accurate.  It's a vibrant, bold yellow.  I chose my pattern (McCall's 5138, view B) because I thought the sleeves went really well with the eyelet fabric.  I followed the pattern pretty closely, only making my usual fitting changes.  With the weight loss I feel like I am relearning my body.  Patterns fit me a bit differently now and I have to remember I can't just do my standard pattern alterations before I cut anymore.  I shortened the waist front and back (I usually just do the back and taper out to a normal front), reduced the shoulder height, added length at the hem, and narrowed the shoulder.  I wish I hadn't shortened the shoulders, as it threw off my bust point just a bit.  I usually need to shorten to shoulder to bring the bust point up to where it's supposed to be.
Imagine if I hadn't  shortened the back waist!  Sheesh!
The only other change to the pattern was adding a lining so I don't need to wear a t-shirt under my eyelet blouse.  I also added the lining to cut down on seeing the facing through the front.  The fabrics I used are at JoAnn's  here and here.  Buttons here.
There wasn't really anything noteworthy about the construction except that I had to watch out how much the knit lining was stretching.  It was a simple and fast sew.

When I was deciding what to make for the contest I decided to hop on the color block trend and hope it would take me somewhere I like.  Go big or go home, right?  I had originally hoped the Jaded Stripes shirt would fit the Pantone colors because it's my favorite combo with the pants.  Alas, it is too blue.
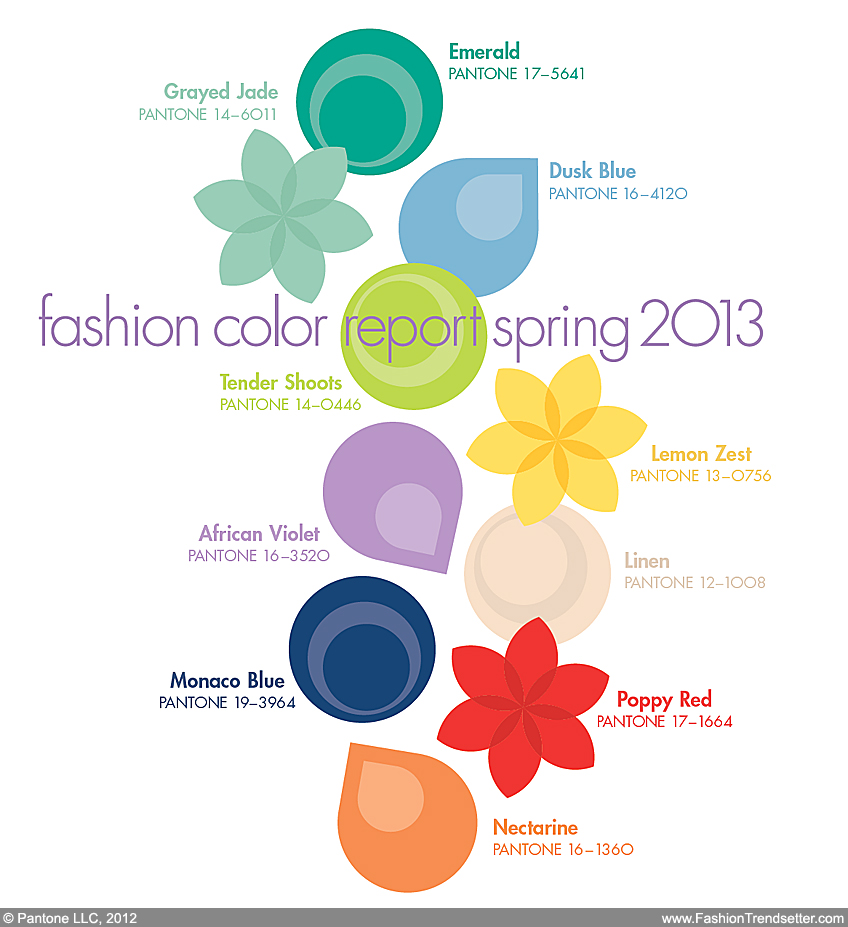
The contest manager was very kind to let me and others know whether or not our colors fit in.  She added the Pantone color dots to my picture of possible fabrics.

I like the combo of the yellow with the purple.  The yellow is so bright and happy, which I love.  The purple is nothing less than my favorite color in the whole world.  I'm glad I get to wear them as pants rather than having them up on the window as curtains like I had originally planned.
So there's my contest entry picture.  Voting is opens May 3-9, so head on over, see what you like and vote for it.  I'm kind of partial to mine. ;)

Thursday, April 25, 2013

Purple Pain-in-the-Patootie Pants

Hello, traditional waistband pants.  We meet again.  Last time we did battle you defeated me.  I'm here to tell you your reign of terror is over!  I shall stand victorious!!!
Here I am, standing victorious.
Okay, so maybe it's not quite that bad when it comes to me trying to make waistbanded pants for myself.  Or maybe I'm not exaggerating in the slightest.  I'll let you decide which you think is the more likely scenario.  Psst...it's the second one.

image via moonwishesstore.ecrater.com
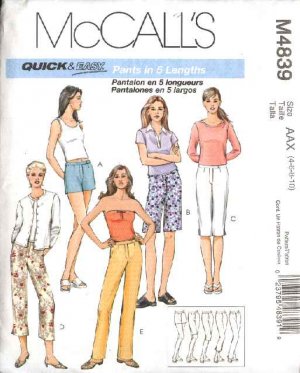
Back on topic.  This is my final sew along piece for The Sew Off.  I started with an older pattern, McCall's 4839, made considerable alterations, then added topstitching and back pockets.  My body and pants patterns don't tend to get along but telling all the reasons why would take a year.  I chose this pattern because I already had it and looked like it would work well with my fabric.  My fabric has been in my stash for at least eight years.  I bought it to make curtains, which never happened.  It's a great lavender with a touch of metallic under weave.  The metallic shows up better in pictures than in real life.
The pants aren't really this shiny when you look at them.
When using a pattern I can generally trust that cutting to my size will give me a good fit.  Umm...no.
Soggy fit on the pants
I ended up taking the waist in six (SIX!) inches by adding in extra darts, taking in the back waist, andpulling in the sides.  The fabric has no drape whatsoever so each leg was shaved down about four inches to thin them out.  That also made them a bit more trendy, which I don't mind.    The other alteration change I made was dropping the waist down an extra inch in the back and three inches in front.  I have a weird body.
Much better
After making the alterations changes I added the fun stuff.  I was going for a jeans-type look without making them jeans.  I added topstitching on the side seams and center back seam, as well as pockets to the back.  I wanted a design for the pockets, but had exactly 60 seconds of patience in which to design it.  I'm pleased with the result.
Know how hard it is to get straight topstitching lines when your baby insists on sitting in your lap as you sew?  Very.

 The button came from my mom's button jar, which happens to be living at my house at the moment.
 I'm happy to say that I have now conquered the traditional waistbanded pant.  That doesn't mean I plan on doing it again anytime soon, but I got the pants to fit and be fabulous!
The End.  :)

Wednesday, April 24, 2013

Pink Blur in Black and Blue...and Pink

 This is the matching outfit for Pink Blur after finishing the Surprise Dress for Blue Eyes.  This version followed the pattern exactly and used the top and pants view.  The shirt could do with a little insert at the neckline.
Front view
The pattern is much more open in the back than I usually choose, but I had to be creative with laying out my fabric.  And at two and a half years old she's not trying to be sexy.
She says it makes her back cold.  Maybe she'll appreciate that in the dead-of-summer heat.
Just so you know, I do NOT beat my children.  That's not always obvious from looking at Pink Blur on any given day but it's been a whole lot worse the past little while.
You're never fully dressed without a smile...and an icky bruise that sits on top of a nasty bump which causes black eyes.
After the incident with the iron I'm afraid someone is going to think I ignore or harm my children.  I don't.  She's just fast.  That's how she got Pink Blur as her blog name.
Now she looks beaten AND drugged.
I can't wait until she gets a bit more coordinated.  Then maybe she won't bash her head on her bed frame after trying to jump over my legs.  Of course that won't save her from repeated head butts given by Blue Eyes when they're in their room for "quiet time".  That was a fun couple of minutes.  Some day I'll look back on this and laugh, right?  Right?  I certainly hope so.

Tuesday, April 23, 2013

Improvised Prairie Chain

The sew alongs I've been participating in are winding down.  There is a contest I've been wanting to enter and my concentration has been on that rather than the sew alongs.  So now the name of the game for the sewing along is fast and easy.  I just couldn't get to the end only to stop.
For Sew-vivor the last challenge is quilting.  The last time I did quilting was for a quilting class in college.  In 1999.  It's been a while.  Ever since taking that class I have wanted to make a full sized quilt using the Prairie Chain pattern I made of block of for my quilting class.  I love how the pattern looks like the colors weave over and under.  It looks intricate but it's super simple.  Back when I took the class I made a copy of the pattern.  Now that it's almost 14 years and 5 house moves since copying the pattern I seem to have misplaced it.  Go figure.  And I can't find the pattern online, either.  It was in a book of pioneer quilts, so if you can tell me where I can get the original I will do a happy dance in your honor.
After buying three fat quarters and measuring the original quilt block I put together a pillow for Pink Blur.  Her sister has a little pillow and there are arguments about who gets to use it.  Hopefully this will eliminate the screaming.  Function as well as form.
I like how it looks.  The only thing I'm sad about comes from my own dumb mistake.  I wrote down the measurements on the left, measurements with seam allowances in the middle, and the half size measurements on the right.  Then I cut the brown triangles to the measurements in the middle and the other colors to the ones on the left.  Oops.  Then I cut the brown triangles down to the left side measurements to match the other strips, even though I knew the proportions would still be off.  It still turned out okay, just with a smaller background. There should be more of that lighter brown.
Blue Eyes still thinks the pillow should belong to her rather than Pink Blur.  I told her I'd make her a red one and that got her to stop bugging me.  I didn't say when I would make it...  Eventually.  Anyway, I still love this pattern.  Someday I'll make myself a king sized quilt in this pattern.


Monday, April 22, 2013

Origami Butterfly Tutorial

 Here are the instructions for folding the butterflies from the Origami Butterfly Wreath.  After a little more searching and digging I was able to find the original tutorial.  Hooray for credit where it's due!  I did mine a little differently because I had only scanned the instructions briefly before I link I had used stopped working.  It was weird.  Anyway, the original is here.

What you need:
Coordinating fabric scraps cut into rectangles.
Sewing machine and matching thread.

Tips before you start folding:

  • The rectangles work best when cut with a 1:1.5 ratio.  Example: 3 inches wide and 4.5 inches long.  A rectangle cut to this size made a butterfly that was 3 inches across at the wing tips and 1.75 inches across the middle.
  • The smaller the rectangle, the better the accent color part on the wings will stand up.
  • For clean finished edges (mine are just raw edges), add 1/2 inch to both the length and width to get 1/4 inch seam allowances all the way around.   Put right sides together and sew 1/4 inch on all sides, leaving a small opening to turn right side out.  Turn and press.  Edgestitch around all edges to close the opening OR use a hand needle and thread to close the opening if you don't want a seam around the edge.
  • For raw edges, put wrong sides together and stitch around the edges at about 1/4 inch to hold the pieces together.
  • If you want a special design to show it needs to go on both of the short ends to best be seen.


Folding Instructions:

Start with your main color DOWN and your accent color facing UP.
You can iron your fabric before folding if you want.  I didn't.

Fold in half crosswise (hamburger style) with the top going down to meet the bottom.

Fold in half crosswise again with the right side going over to meet the left.

Pull down the top left corner so the top layer opens out and the corner meets the inside crease in the middle. The top layer should have a triangle of the main color on top and a rectangle of accent color on the bottom.

Repeat with the reverse side.  It should now look like a house.  This is a good place to iron the point at the top of the house to keep the edge crisp.  I wish I'd done that with mine, as some of the points on the body didn't stay in place when I was all done.  This is the only place I would press it because I like the more 3D look of the butterflies that aren't pressed flat.

Take a middle corner and fold it back on itself to the inside of the rectangle.  It should form a triangle.  The top crease line of the triangle should line up with the bottom edge of the triangle.

 Repeat on the other side.

Take the bottom corner of the top layer and bring it up close to the point on top.  This forms the wings.  Pin in place.

Repeat on the other side and  turn so the butterfly is right side up.

To secure the butterfly, stitch the crease of the wing onto the body.

Sew as close to the point of the crease as possible so the stitch will be hidden under the accent part of the wing.  You can also hand stitch this area in place so you an really hide the stitches well.

There's your butterfly!  You can use it for just about anything that you want to embellish.  The next time I make these they'll be going on a dress and I'll probably make some to add to a headband for myself.

They look pretty good on a wreath, too.  ;)

Saturday, April 20, 2013

Purple Top

It seems like I've spent so much time recently thinking outside the box and/or needing to do extensive alterations to patterns that it was really nice to just cut and sew a pattern.  I've made this pattern three times now.  The first time I modified it to be a maternity pattern and made it out of a Pepto Bismal pink knit.  I call it my awesomely pink shirt and I love it.  But it's a maternity shirt.  I made the pattern again, but with different neck embellishment and lengthened to be a dress.  That was made to be adjust able for either maternity or regular.  Now, finally, I have this shirt in exactly the style I wanted and in a super comfy poly interlock.  It's light and airy and perfect for summer.
I made the picture on the live model on the left.  The only changes I made were bringing the neckline up and in a bit and omitting the front pocket, but keeping its fullness.  I totally love it.  Because the shirt  is purple it was destined to be my new love.
The sleeves turned out a little different that I thought but not bad.  Extra room in the sleeves  is rarely a bad thing for me.  The shirt feels airy and wonderful.  Now that I've made the pattern tree times I'm pretty comfortable with it.  Love love LOVE this top!

Wanna know what looks freaky?  Moving a little as The Hubs tries to take the picture.  My face looks pretty bad.

Jaded Stripes

Do you ever have a project that you pull of the machine and then do a happy dance, exclaiming, "Man, I'm good!" and smiling broadly?  This is just such a project.  I made this to sew along with The Sew Off.  The theme was a project for you.  I'm my favorite person to sew for, so I didn't need a whole lot of motivation.  :)

There was a great striped fabric at JoAnns that went along with one of the Pantone colors for 2013.  Did you know there's more than one?  I didn't know that until a couple weeks ago.  Heck, I didn't know there was one color of the year until last year.  Anyway, my fabric's color looks like grayed jade to me.  Love it.

My original plan was to use Vogue 1109 for some fun with the stripes.  When they went on sale that pattern was all out at my local store.  They were even out at the one by my parents' house.  It was a sad moment.  I went with Vogue 8856 instead and I am ever so happy I did!  I think I like my result with this one better than I would have liked my original plan.
I made several changes to the pattern.  The first was using the striped fabric.  That's not so much a change as it is adding difficulty to the pattern, but it did make me change the grainline on two of the pattern pieces.  Other changes included shortening the sleeves (hooray for spring and summer!), narrowing the shoulders, and raising and bringing in the neckline.  I was worried I brought the neckline up too much and that I'd regret it.  Silly me.  I've never, ever regretted modesty. Ever.  The neckline is perfect!  I like not flashing the kids when I bend over.

I have a degree in butt-kickery from the University of Stripe Matching.
Laying out and cutting the fabric took almost as long as sewing it.  The stripes match at the sides, shoulders, center back, front waist. and sleeves, though I wish I'd chosen a different stripe to match at the sleeve.  There's even an additional piece on the back (pictured above) that got matched.  There's something about seeing the stripes match up nicely that makes me feel like a million bucks.

I added a few details to help make the shirt look like ready to wear.  I cut the diagonal pieces with the top of the dark stripe on the seam line to get a cleaner look.  The first plan was to cut it on the true bias.  I'm glad I thought about it a little harder before cutting my fabric.  I also used my double needle for the hems on the sleeves, bottom, and neckline.
Photo bomb courtesy of the Pink Blur
I couldn't be happier with this shirt.  It's fun, it's comfortable, it's light for summer, and it shows off my mad stripe matching skills. :)

Wednesday, April 17, 2013

Wowzers Wednesday--Day 28: Challenge Complete!

Okay, so I'm a bit behind on the getting the challenge done, but it's done!  Woohoo!  And I only missed one consecutive day.  Not too shabby.  I learned that, as much fun as I was having with blogging, there comes a point when it becomes too much.  I didn't plan on continuing the challenge after  finished and THANK GOODNESS for that!  It's been fun but after trying to fit in as much as I needed to it started to get unfun.  At least now I know what my favorite things to blog about are and I can choose to post those whenever I happen to feel like it.  Next up will be a shirt and pants.  Assuming, of course, that I get the thread I need to finish them.
For the big wowzer today I would like to present Q-ball.  A week ago he would take a tentative step or two (never more than four or five) and now he's walking at every opportunity.  It's so funny to see such a tiny person walking around.  You would think I'd have noticed it easier after having had two other munchkins, but no.  And he's just so blasted cute when he does anything at all.


Tuesday, April 16, 2013

Ta-Da! Tuesday--Day 27: Little Things

This week I accomplished a lot but it was mostly little things and mostly on the weekend.  The amount of sewing I had on my plate was kind of stressing me out and I just didn't want to do it.  Once I remembered that the projects weren't mandatory I was able to relax and stop putting them off.  I guess that's what happens when you've been so used to having deadlines for paying customers, even if that hasn't been the case for more than two years.

There's no picture of the skirt I stitched up really quick because I haven't hemmed it yet.  As soon as I do I'll post a picture.  The Pink Blur got her outfit to match the Surprise Dress but I never took a picture and it's in the laundry at the moment.
New wallet.
I did, however, participate in the Passport Wallet Sew Along on SewitGirl.  Here's a quick tip, there is a discount code for some PDF patterns in that post and they are good until the end of the month.  This is my first time purchasing a PDF pattern.  For another quick tip, the instructions on SewitGirl are way more clear than what's on the pattern.  I wish I'd looked through those before sewing up my wallet.
I love the inside.
I'm loving the wallet.  Before I finished this I carried my license and cards in my planner.  That meant I had to carry the diaper bag e-v-e-r-y-w-h-e-r-e and that gets old.  This wallet fits my necessaries and I can shove it in a jacket pocket when I don't need to haul around the diaper bag.  Mine ended up smaller than it was supposed to but it still fits everything.
For wrapping up sweet babies who are born before their time
I also finished the Annie Blankets.  When I went to buy the fabric I was surprised at how little they had available in delicate flannel prints.  This was the most subtle print I could find.  All the rest were garishly bright background with candy or skulls printed on them.  I figured it would be best to stick with the green and white houndstooth.  The big surprise for me was my reaction to the finished blankets.  When I saw them in their finished form it took my breath away for a moment.  Seeing and holding those little blankets took me back to the day almost exactly six years ago when I held my first little boy wrapped up in a blanket just like these.  I remembered what it was like holding the empty blanket to my heart so many times after we returned home without our son and weeping for what might have been.  Enough time has passed now that I can look back on the lessons I learned while I was in the thick of grieving and be grateful for them.  I can't say I'm grateful to have lost my first baby, but I can say that what I learned from the experience is sacred and special and I'm glad to have learned it all.  I hope these can bring as much comfort to another set of parents as the one we have brought to us.  Actually, I wish no one ever had to use these.  But I have no control over that and so I gie these as a remembrance of my baby and of others whose parents didn't get to know them.

Monday, April 15, 2013

Move-It Monday--Day 26

I think for this week's goals I'll just try to finish what I've started.  I have the fabric ready for the Annie Blanket and I will get that done so I can either mail it off or donate it here.  It will be a quick sew and I've been meaning to get it done.  For anyone who wants to join in it is a great remembrance and memorial.
image via surecancraft.blogspot.com/
Also on the list is one of my weight loss reward shirts.  It's all cut out and ready to go.  I've also got the fabric and patterns for pants, a skirt, and two shirts.  Not all of it will get done this week and that's okay.  Mostly I just want to finish the Annie Blanket, the shirt, and get a solid plan together for my sew along project for Sew-vivor.  I've got The Sew Off covered with either of the items for myself, so long as I tweak them a little to fit the contest rules.
image via nnwi.org
My last goal is to read up on what is required to form a neighborhood watch.  Over the past few weeks there have been a lot of thefts in our neighborhood.  It started with getting into cars that had been left unlocked, then things were taken off porches and out of garages, and now things have progressed to the point of home invasion.  One neighbor's home is missing cash and prescription medication.  Another neighbor came home to find a window well cover removed and signs of an attempt to get the screen off.  We're a close-knit little community and it is disturbing that our friends and neighbors are being violated like this.  The Hubs and I think whoever is doing this is probably casing the neighborhood during the day.  My kids are young enough that I won't let them play outside by themselves anymore.  Taking my stuff is one thing but my kids are another matter entirely.  Hopefully we find a resolution to this sooner or later.  For the thief's sake (as well as everyone else's) I hope there are no more break-ins.  I would guess that 7 or 8 homes out of 10 in our neighborhood are armed.  I just want us all to be safe.