Tuesday, March 27, 2012

Crib Bedding


I finished the crib bedding today.  Yeehaw!  (I just moved into a rural area so I've got to get used to speaking like the natives, right?)  The crib sheet and skirt are all done and even placed in the crib.  Maybe that shouldn't make me overly proud, but I'll take any accomplishment I can get when I'm as roundly pregnant as I am at the moment.

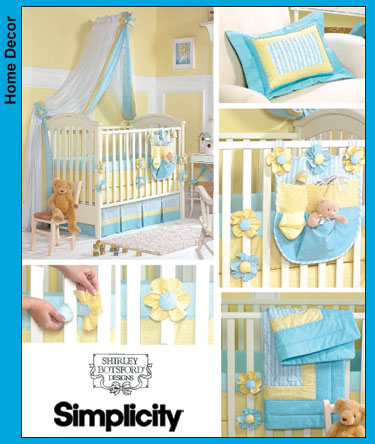
Picture from sewingreview.pattern.com
I'm extra pleased that they fit into my $0 budget for the nursery.  There's still more I want to make (curtain, diaper stacker, possibly cover a lampshade, etc.) but I'm happy to have the essentials done.  All he really needs is the sheet to sleep on so I'm doing well to also have the skirt done.

For the  bedding pattern I kind of merged the one I used for my daughter (Simplicity 3795) with the one from Amy Butler's book Little Stitches for Little Ones.  (follow the link and if you click on "First Pages" after you click on Look Inside! and continue clicking through you'll find a picture of the set.  Sorry, that's the best I can do for a picture)  From Amy Butler I used the basic measurements for the sheet and crib skirt sizes, as well as using panels rather than large pleats.  From the Simplicity pattern I used width measurements for the three different  fabrics to be used for the crib skirt.  I'm completely skipping out on the bumpers pads because 1) they were more trouble than they're worth last time around, 2) darling as they are, SIDS stats are increased with using them, and 3) my second daughter slept with her face pressed into her crib bumper and we ended up just taking it out of the crib, anyway.

The big challenge with the crib sheet was lack of yardage.  I wanted to use the print with larger animals but there simply wasn't enough yardage (or was it width?).  Instead of deciding which other fabric I wanted to use I just took the measurements for side panels straight from the book and made them from the coordinating yellow fabric.  I thought I was brilliant until I saw that there are companies selling crib sheets this way so parents can avoid putting bumpers in the crib.  Ah, well.

My big surprise came as I was deciding which fabric to use on the crib skirt.  The surprise was the choice to use the printed side of the blue fabric.  I'm not usually a fan of mixing lots of prints, but it just looked a whole lot better to use the printed side.  So I did.
See?  Much better.
The next problem (in my mind) was that I wanted a little more embellishment for the crib skirt.  To me that is the show piece of a bedding set, particularly when bumpers aren't being used.  But embellishment would mean I'd have to spend money.  Dang it.  I decided to bite the bullet and purchase some jumbo rick-rack when I got my little stroke of brilliance.  The darker yellow color I had from leftovers didn't have a lot of yardage, but you don't need a lot to make picots.  I love picots and knew they would make a great addition...especially without needing to purchase anything.

Someday I will learn to take good pictures that all have the same light.
Just a little embellishment can take a project from kinda-cute to darling.  I'm really a fan of the picot trim.  I also like that it feels bolder and more masculine than rick-rack.  But that's just me.  I hated myself for choosing to make picots while I was in the process of cutting, pressing and sewing them.  However, as is my usual, once I got them on the crib skirt I was happy I'd done it.

Finished product being stepped on by daughter #2, aka The Pink Blur
Once I put the crib skirt on the I realized that most of the picots are covered by the bar across the bottom.  Bother.  One would think I might have planned for that.  I blame pregnant brain.  At least it should fix itself when we drop the mattress down to the next height.

I'll clean out under there before baby is born...maybe.
If I feel really ambitious I could make little animals to attach to the crib rails in place of the flowers on the pattern I used before.  I certainly remember making all those flowers.  Oh, so very many flowers.  I think making those was enough to give me arthritis all by itself.  But they were charming and I wasn't sorry.

Overall, this project isn't as scary or irritating when the bumpers are left out.  I highly recommend skipping them for the sake of your sanity.  I have other pictures and things to use for a tutorial if anyone is interested.

Thursday, March 22, 2012

"Beg, Borrow, and Steal" or "Making a Free Nursery"

There were a few things I learned in my brief stint as a teacher.  Okay, there were a LOT of things I learned.  One of them was what I call the Teachers' Creed.  You might think it has something to do with ensuring every child has a quality, educational experience in the classroom.  While that is every teacher's goal, that's not the one I'm talking about.  I'm talking about "Beg, borrow, and steal.  Don't reinvent the wheel."  This has to do with maintaining your own sanity by using others' ideas and making them your own to work with your students. You don't need to create everything yourself.  Ask for help.  I put that principle to good use when gathering the fabrics for the nursery bedding.

My original idea for the nursery would have included buying everything new...and probably not sewing the bedding.  I did that for my first daughter and swore I'd never do it again.  Too much work.  Having more time than money changes that up.  Because I'm going for a $0 budget to make this nursery I have no choice but to use what I can get my hands on for free.  Beg, borrow, and steal, right?  Note: Don't really steal.  It's wrong and bad and I don't actually do it. I don't have a big fabric stash (all mismatched knits) so I had to turn to my mom and ask if I could raid hers.  She has way more than I do.  My mom had actually purchased some fabric for me to use for my oldest daughter's crib bedding.  I had already purchased all my fabric for that project.  While a jungle theme wasn't really what I had ever planned on doing for a nursery, the price was right, there was enough yardage, and the fabric was cute enough.  The two jungle prints and the lighter yellow came from my mom's fabric boxes.  I wanted a little more variety, so I called my grandma and asked to go through her stash.  The orange print and the blue solid came from her house.  The darker yellow on top is leftovers I found at my house, but I doubt I'll be able to use it because there's so little of it.

The next problem was a crib.  We bough convertible cribs for the others to grow up with.  Then we only need to buy mattresses.  We're too poor to buy a crib right now.  We put our oldest in a big girl bed (with a mattress set my parents no longer need), our second in the toddler bed that our oldest used to use, and planned to put the baby in the crib from our second.  That idea worked well enough.  Then I saw someone post on Facebook that they had a crib (in need of repair) to give away.  I took it.

It requires a bit more repair than I feel comfortable putting a baby in after I'm done, so it's back to square one.  But don't think I haven't got a plan for that little crib.

The great thing about telling people you're looking for free or cheap nursery stuff is that it gets it on their radar, too.  Last week I got a call from my mom asking me if I wanted a gently used crib.  It was used for sleepovers at a grandma's house.  I quickly said yes.
Yes, the nursery is currently serving as the catch-all room.  You know you've done it too.
So now everyone has their own bed again.  The crib sheet above is one I made for my oldest daughter.  You can see why I'm not excited to put my little boy in it.  Anyway, we'll just have to buy this kiddo a convertible bed when he's older and we can (hopefully) afford it.  I'm so excited to see how the nursery comes together!  Oh, yeah...I like the price, too.

Monday, March 19, 2012

The Tale of the Purple Picture

The majority of my house has purple walls.  I love them.  I'm pretty lucky my husband agreed to it.  The purple is actually a pale lavender but still counts as purple.  Going into it I knew exactly what I wanted.  It needed to be noticeable while not assaulting the senses.  Again, I'm lucky my husband trusted me enough to agree to having purple walls.  Most everyone else I talked to about it seemed...politely doubtful of the wisdom in my choice.  No one said outright they thought it was a bad idea.  Everyone I talk to is way too nice and way too tactful for that.  The message came through, though, especially from the men.  My very sweet mother in law also gave me the impression that she thought we might not be happy with purple, though she never said anything of the sort.  That was what I read into it.  Actually, I started to feel like the misunderstood genius who later becomes the villain in a kid movie.  You doubt the brilliance of my purple walls?  Well, I'll show you!  I'll show you all! Ahahahaha!  Okay, maybe it wasn't that bad.  I did, however, harbor pleasant thoughts of peoples' reactions after seeing how I could make it work.  Take that, doubters!
The purple really is pretty subdued.
Choosing the final paint color was a bit more tricky, as I wanted something that wouldn't be too pink or too white once it was on the wall.  You really do have to either paint a sample on the wall or on a board to see what the paint does with the light in the room.  We were in the process of choosing the final color (including having purchased five samples and painted the boards) when my husband got a call from his mom.  When he got off the phone he said, "Mom bought us a picture for the new house.  She said there's a purple flower in the corner and we can take it to the paint store to have them match the color."  I was floored.  And pretty upset.  She chose art for our home that will ALSO dictate the color of the walls?!?  How...how...how... What if I hate the color?  What if I hate the picture?  These were all things I was screaming inside my head.  I didn't think it the best of ideas to voice my thoughts aloud until I had a chance to calm down a little bit.  I just went ahead and chose the wall color and figured that if it didn't go with the picture (or if I simply didn't like it) I just wouldn't hang the picture.  Ever.

When my in-laws brought it over the next day I was nervous to see what it was.  Especially to see what the colors were.  I opened it after they left.  There have been few times in my life where I've felt the kind of relief that washed over me when I opened the box.  It was a picture of the Mt. Timpanogos temple, where my hubby and I were married.  I love that building.  And the "purple flower in the corner"?  Well, you can the picture below.  Between the sky and the flowers the picture was almost certain to go with any purple I might have chosen.  After I found that I totally loved the picture I talked to my mother in law about what I had understood from what I'd been told.  Both my husband and I had completely misunderstood her.  All three of us had a good laugh.  I had to wonder what I was so worried about.  I've seen how her house is decorated and I like her choice in color and art.


Now the picture hangs beautifully in our front room.  I really do love it.  It looks fabulous with my purple walls.
Now I just have to wait until we can afford the living room set I want to go in here.  It will look stunning.  Our current couch is in the post-relative style (given to us for free by our relatives and not really my style, but in good repair) and makes for comfy seating until the budget opens up a little more.  Donations are gladly accepted. ;)  Did I mention that I love my purple walls?  They'll look great with crown molding and more pictures.

Tuesday, March 13, 2012

Bookcase Redo

After
Before
In keeping with my plan to use what I have to decorate our new home, I chose an old bookcase as as my first project.  To say it's nothing special is a bit of an understatement.  It's a simple laminate that does it's job just fine.  Whether it came with my husband as part of the marriage or whether we bought it later is something I just don't remember.  I brought it up from the basement because I wanted a bookcase to hold books and movies for the kids next to the TV.  My preference was to have an all black bookcase to match the TV stand and the other decor I plan on putting up as I go.  And it would look great with my purple walls.  Because I need to use what I have I figured I could try something I've never attempted before: spray painting.

I wish I had researched painting laminate furniture a little more before I began.  Mostly I knew that there needed to be some prep work to get the paint to stick on properly.  Being rather impatient to just get the project going (and wanting to finish several other projects before my baby is born) I decided I could get away with just buying the Krylon paint+primer spray and call it good.  That choice ended up working out for me.

Another bit of necessary prep work was wiping the bookcase down and getting rid of this hardened glob of unidentified yuck.  

I don't know what that is or how long it's been there.  It just needed to go.  Sandpaper wasn't effective, but the blade of a butter knife chipped the glob off nicely.  I imagine that would work well for any laminate project, so long as you don't mind losing the top layer of the laminate.  It shows a little on the finished project.  You could probably get rid of the mark with a light sandpapering prior to painting, but I didn't care that much.

After the glob was off I used sandpaper to lightly scuff up the cardboard back to prep it for the white paint.

Wait...the white paint?  Yeah, I decided that just painting the whole thing black wasn't quite ambitious enough.  I figured that I would try yet another thing I hadn't ever done and put fabric on the back of the shelves (more on that later) for a little interest and contrast.  I had a mesh fabric and wanted the white to show through.  Sometimes I'm a masochist that way.

The white paint was leftover from repainting the baseboards and trim in our house.  It's a semi-gloss in the same color white that we have throughout most of the house.  The price of "free" was just right.  I also didn't bother to tape off the sides or paint primer behind the white.  I should have put on primer.  The sanding wasn't enough.  You'll see.  And, yes, I did paint the white onto the back while it was laying on my living room carpet.  Nothing dripped. :)  I did take the bookcase down to our unfinished basement before spraying.
Once the paint was dry I busted out the painter's tape and some grocery bags (can you guess which store is closest to my house?) to protect the white while I sprayed the black paint.  It took the whole can to coat all the visible surfaces.  There were a couple of places on the shelves that missed getting all the paint they needed. No pictures of the spraying process.  Sorry.  I did, however, take a picture of what happens after you take tape off a painted surface that wasn't properly primed:
See?  Big mistake to skip priming.  That white paint peeled like a sunburn.  I was forced to buy a bottle of black craft paint and pray that it matched the spray paint to do all the required touch up.  I got lucky.  I touched up the white where it had come off, then I used the craft paint hit the black spots I missed , as well as to touch up places where I got touch up white paint on it.  I really should have primed.

Once everything was dry (after three sets of touch ups...grumble) I moved on the the next frontier of I've-never-tried-this-before.  Several years ago I heard about using laundry starch to apply fabric to a wall without damaging it.  I had a large quantity of gray mesh fabric with black velvet flocking leftover from a skirt I made at least ten years ago.  It was begging to be used in a room with lavender walls.  The whole reason I spent all the time and frustration using the white paint was to best show off the mesh fabric.

So here's the procedure for putting up the fabric.  Cut the fabric to the desired size and/or shape.  Get some fabric starch.  I sent my husband to the laundry aisle at Walmart to pick it up.  Pour a little bit into a bucket to soak the fabric.
Wring out your fabric so it's still wet but not dripping.  Smooth the fabric over the area you want to cover and get rid of any air bubbles.  With the mesh I found it easier to center it and work from the middle out.  Again, no pictures of the process.  It's not hard.  I hear that fabric sometimes bubbles and assumed a mesh fabric wouldn't be so bad.  It wasn't.  The beauty part is that when you get tired of the fabric all you do is peel it off and wipe off the residue.  Your walls will be good as new.  Here's a picture of what it looks like when finished.
Mmm...fuzzy pics.  My favorite.
Yup.  I like it.
I like it a lot.
Once everything is dry you can fill up the bookcase.  I tossed a few pictures on top that I found while I was looking for my kids' books.  I have no idea (yet) what I'll do with the space on top, but this works for now.  I still have more books to get out of boxes, too.
I think it goes well with the room and the fabric adds a fun element.  Now I just need to wipe off the starch I dribbled.  Total cost for this project came to about $7.  That made me smile.

Tuesday, February 21, 2012

Use, Wear, Do


I'm not sure where I first heard that saying, but it was probably from my mom.  Through the years of waiting for my husband to finish with school I certainly learned to live on less.  Two months after he started his job he got an amazing raise that allowed me to stop working and just be home with our girls.  The money seemed to be there in great abundance and I stopped being careful with how I used money.  It was fun, but not smart.

A few months ago my husband got a raise that was not only amazing, but fantastically amazing.  Surely money would never be an issue again.  Ha!  Anyway, we bought a dining set (we'd given ours away), minivan (necessary with baby #3 on the way), a laundry pair (also given away), and a sectional (also necessary because our new house has two rooms that need seating).  Oh yeah, we also built a house.  Not that there's any expense included in that...

As we were contemplating which bedroom set and new mattress to buy we noticed that our funds weren't as abundant as we had become accustomed to.  I spent a morning going over finances and discovered that money really doesn't grow on trees.  That was a shock to the system.  So now we're back to economizing (a LOT) and the "use it up" saying is my new mantra.

Now I'm dealing with the disappointment.  I've always wanted to go all out and do a nursery for my kids.  I even had a plan going for this one and I was super excited to get started on it.  With the first two kids we were renting and a room makeover wasn't a possibility.  Now that we own we can't afford to redo a room.  Dang it.  What's a girl to do?  Well, I decided that I could 1) ignore all common sense and redecorate despite the cost, 2) whine and grumble and cry and sulk, or 3) make frugality an adventure and see what I can do to make it work.  I thought the last one seemed like it would make us the happiest over the longest period of time.  So I'm going with that one.

The really fun part for me is that it will allow me to get some creative juices flowing.  Sometimes it takes more imagination to revamp what you have than to find new things that work together.  Then I remembered I can document it here so that when everything is paid off I can remember that there are things we can do to avoid getting back into financial straits.  I may actually have fun with this.  The first project is making a nursery with things we already have.  It'll be interesting.

Sunday, January 22, 2012

The Ultimate DIY House

When something really great comes along, you just need to share it.  I feel a little remiss in not having previously  mentioned more about the program we used to get our home built.  Several years ago we read an article in the newspaper about the open house of a group that had finished building their homes through Self-Help Homes (formerly Rurual Housing Development Corporation).  It's a mutual self-help program.  The basic idea is that a group of families works together to build their own homes.  When all homes in the group are completed everyone moves in.  Pretty great, right?  It gets better.  The program is for families that meet certain income guidelines; it's for families that would not otherwise be able to afford a home.  We logged the information away in our brains to bring out again when we felt the time was right.

Fast forward to summer of 2010.  My husband had just graduated from college (hallelujah!) and started a job. Two months later he got a promotion and a raise.  With the raise we figured we would be able to afford the mortgage on a house if we went through a mutual self-help program.  The time was almost right.  We started to go through the application process.  Before meeting with people in the Self-Help Homes office we decided to hold off for a little while.  It was only a few months later that we decided the time really had come and we completed our application.  We were accepted into the program in February of last year.  We were the second family in our group to be approved.  After that it was just waiting for the group to be complete, which took until late March or early April.  We broke ground in May and started building in June.  There was even an article written about the ground breaking in the paper.  They misquoted me a bit, but that's okay.  If you look at the second picture in the box you'll see me giving my little speech.


So how do nine families without any building experience get away with building homes that are safe, attractive, up to code, and actually livable?  Self-Help Homes assigns one of their construction supervisors to work with each group.  It's the supervisor's job to train the families on construction techniques, check for quality, and basically oversee the entire process.  If we did something wrong we had to do it again until it was right.  That's a rule that didn't budge.  We were blessed to have a great supervisor who was not willing to compromise on any quality issues.  It makes one feel so much more confident about how well the house will stand up to being lived in.

Aside from meeting income guidelines there were other rules we had to abide by.  For example, each family is required to work a minimum of 35 hours per week.  To say that's a bit of a stretch for working families is an understatement.  We were allowed to have volunteers take on up to 17.5 of the weekly hours.  Any time missed needed to be made up.  Time missed on Saturday counted double.  There was a lot of sacrifice involved in making our hours.  We were lucky enough to have reliable babysitting that allowed us to work on the house together.  With no volunteers we were able to get around 42 hours a week.  Our group was also very fortunate to have lots of volunteers from United Way and BYU to help out.  It was very much appreciated.  Most of the work is done by the families building the homes, but there were also sub contractors who did part of the work.  We framed the homes, but we did not do the work on insulation, stucco, or dry wall, to name a few.  Those things were left to the professionals.

There really isn't too much to say about this program.  The Hubs and I had other options for less-expensive housing, but we chose Self-Help Homes because of everything involved.  We thought it would be a good thing to have a brand new home, as well as to learn first-hand the skills needed to construct and maintain a home.  The homes are built to the highest standard and are energy star approved.  We also loved the idea of being able to work with our neighbors and get to know them before moving in.  We're so glad we applied when we did.  My husband got another raise at the end of 2011, which was enough to have made us ineligible for the program.  As it turned out, we've been able to build a home, build a community, and build confidence in what we can do.  It's a program I would suggest to anyone.

Wednesday, January 18, 2012

This is What "Done" Looks Like

Several months back I decided that I could blog the process of building our home (the original plan) or I could spend the time actually working on the house and do one massive post once everything was complete.  Obviously, I chose the second option.  I suppose I could go back with all the pictures I took and document the entire process.  I think I prefer to just show pictures of the completed house and share the documentation part for making our new house into our new home.  So here are a few pictures of the FINISHED house, courtesy of our building supervisor's Google album:

Kitchen and great room


Great room (living and dining until we finish the basement, dining on the other side of the bar)


Entry and hallway, taken from formal living room


Kitchen


Master bedroom with bathroom and closet


Finished exterior

It's surreal to be finished with this project.  We started coming to the work site on June 18, 2011.  That was the day we came for safety and tool training.  Most of the nine couples in our group were highly unfamiliar with the tools in the trailer.  Palm nailer?  Framing gun?  Hole hawg?  What are those?  Times have certainly changed.  Nail guns and circular saws were once kind of scary sounding to me.  Now I go to tool departments and drool.  I actually asked my husband for a circular saw for Christmas.  He got me makeup brushes instead.  I thought it was pretty funny.

Real work began June 20, 2011 when we started training on basement walls.  That means it was just under seven months from when we started to when all nine home passed inspection on January 17, 2012.  All of us in the group take ownership of our homes on January 26th, immediately after the open house.  Most families are moving in that evening.  We'll be moving the first weekend in February so that we can personalize our wall colors before moving in.  Exciting?  You have no idea!  Unless you've also done it.

I'm so proud of our group.  We've all worked so hard and sacrificed so much to get this done.  Our accomplishment is pretty impressive, especially when one considers our complete lack of prior experience and the very high quality of the end result.  We can thank our supervisor for that.  In the end it was all worth it.  I feel like I can take on any project out there (and I definitely have plans!) with great results.  Nothing is impossible.  Congratulations, Group 33; we've earned it!