Tuesday, July 10, 2012

Making a New Me, or Losing Two of My Firstborn

The Hubs took two days off before the Fourth of July and we did a lot of great stuff together.  One of those things was a family trip to the zoo.  The walk up to the parking lot has quite the incline.  Blue Eyes was done walking and wanted to be carried.  Rather than listen to the whining Because I'm such a sweet mommy I agreed to give her a piggy back ride.  By the time we got to the top of the hill I felt like death.  There was a bit of grumbling on my part about how out of shape I am and how I need to lose weight.  That's when it occurred to me that carrying my daughter was difficult not just because I had her extra weight, but because I also had my extra weight.  That breakthrough in thought came because my extra weight is equivalent to carrying two Blue Eyeses around with me all the time.  All. The. Time.  No wonder I get tired.

That provided some motivation for me, but it was also getting a copy of pictures that threw me over the edge.  As pictures go it's not bad but, oh my, I never realized how badly I have "little head" problem.  You know, the one where it looks like you're part way through some kind of witch doctor head shrinking ritual which leaves you with a tiny head and enormous (by comparison) shoulders.  The pictures were taken the day before our outing to the zoo.

I found myself unhappy with how I've been looking.  To top it off, I've been gaining weight since nursing.  That always seems to happen when I'm breastfeeding, but that doesn't make it feel any better.  I weighed myself and found that the only time I've ever been heavier was a few months ago, just before giving birth to my son.  Boo.  

So now I have some motivation to make lasting changes.  And I'm liking it.  I've attempted a few diet and exercise blitzes that promise big results only to drop out and fail within two weeks.  The change was simply too radical.  This time my mind set is that it takes the time it takes.  If I make a mistake I'll do better the next day or even the next hour.  Beating myself up will not help (but it does usually get me several cookies).  I'm trying to choose better, more healthful foods and gradually start moving my body more.  When I get cravings I either limit my intake or remind myself that I'm in control of my body, not the other way around.  I have to be able to live this if I expect change.  

Losing my daughter's body weight twice over is a tall order.  My "ideal" BMI puts me at 132 lbs.  I don't think that's actually realistic for my body.  If I lost my daughter's weight once I would be over the moon happy.  So that's what I'm working on for starters.  And guess what...I'm down two pounds already.  :)  Here's to taking charge of my body!

Monday, June 25, 2012

2012 Baby Contest

I have once again entered the kids in the Freedom Festival Baby Contest.  This was my first year bringing along a boy.  Last year we were building the house and my parents took the Pink Blur.  I'd signed up and paid the money before I knew I wouldn't be able to make it there.  This year I was able to take her and Q-ball myself.
I think she's not a fan of contests, but she DOES love the costume.
Pink Blur went as Wonder Woman.  I used a swimsuit pattern and added a circle skirt at the waist.  The stars, belt, and Wonder Woman logo were attached with WonderUnder.  I had originally planned to do a satin stitch around the outside edges and on the detail for the logo.  That plan changed when I remembered I would be doing a satin stitch on knit.  Umm...no thanks.  For the detail on the logo I used my super skills of a ruler and a Sharpie to get the straight lines.  Easy cheesy.  I ran out of time to make boot covers and figured those were less important than the rest.
And now you know my last name.  :)
Q-ball went in a flight suit I made for him from an old t-shirt Then Hubs doesn't wear anymore.  The hat came from pant trimmings from Air Forces blues.  I added the silver ribbon because silver piping on your Air Force hat basically means you're in charge.  The combat boot socks were a hilarious online purchase, as well as the little pilot glasses.  The name tape and wings were scavenged from The Hubs's old uniforms.  He got second place in the age category and first place in the costume category.  He was the only entrant for costumes in boys his age and one of two entrants in the general age category.  A kid can't win first in more than one category, so he won his first and second place awards by default.  I'll take it.  :)  All my kids are pretty stinkin' cute no matter what.

Saturday, May 26, 2012

Cost Effective(er) Moby Wrap

There must be at least five different baby carriers at my house.  I've tried most everything out there and have found what I do and don't like.  The Moby Wrap is right up there at the top of my "like it" list.  I just don't like the price.  I can't justify that cost for a single strip of fabric.  So I talked to a friend of mine who has one and got some dimensions from her.  That was almost four years ago and I don't have the original dimensions.  Sorry.  What I do have is good enough, though.

Yours won't come with the eternal spit up mine tends to have.  Say it with me: machine washable.  Good.
I like to use interlock knit because it looks the same on both sides and the cut edge doesn't roll.  It also has more stretch in the width than in the length.
See?  Same on both sides.  It makes me happy.
I once used fabric that had spandex in it and a lot of stretch in the length.  It ended up cutting off circulation in my baby's legs and little Blue Eyes ended up with purple legs.  No fun.  Jersey knit without much spandex is another good (and usually cheaper) knit to use because it's sturdy enough without being too heavy.  There are tons of cute prints available in cotton jersey.  I just don't like how the cut edges roll.
Knit side, purl side, and lots of roll.
Start with 5-6 yards of fabric.  That will actually give you enough fabric for two wraps.  If you only want to make one wrap you can buy 2.5-3 yards and cut it up the center to make two long, skinny strips.  Place one right on top of the other before continuing.  There will be a seam in the center of the wrap when you're done, but that will also help you to find the middle when you are ready to wrap it around yourself.  I bought a full 6 yards because I had a baby shower to attend and wanted to make one for both the mom-to-be and myself.

For a wrap without a center seam the very easiest way to cut out the carrier is to fold the fabric in half along the width (hamburger style) .  It makes for more even edges and takes up less space on your cutting board.  Or your living room floor.  For a wrap with a center seam just make sure your two cut pieces are right on top of each other with the edges matching up.


Smooth out the fabric as much as possible.  This task is much easier when there aren't children running over it or deciding to park their little keisters in the middle.

How does anyone stay mad at that face?  It's impossible.  The Pink Blur wins again.
The wrap in the picture above was made to the measurements my friend gave me.  Rather than measure and cut again I just used it as the pattern.  It's about 24-25 inches wide, though you could probably go as narrow as 20 inches and still be happy.  The tapered section is 29 inches long from the point to the parallel edges.  If you're an anal nut job like I am it would also help to know that the taper is 14 inches wide at its midpoint.  Measure, mark and cut.  It's pretty easy.

For wraps made with 2.5-3 yards of fabric, stitch the two pieces together.  I suggest a flat fell seam for both stability and a uniform look on both sides.  You now have one loooooooong piece of fabric to wrap a baby in.

No one in their right mind would worry about this, but I did.
If you weren't convinced of my analness before, it can be seen again in the picture above.  I folded the cut edges in half to match up the tapers.  Then I trimmed them so they matched exactly.  Toldja I'm a nut job.

Now all that's left is to serge, serge, serge around the edges.  Then serge some more.  It takes awhile to go up and down 6 yards of fabric.  Most knits don't require a serged edge, but I think it looks more finished with serging.


Wearing instructions can be found on the Moby Wrap website.  I'm just now moving my little man up from the newborn cradle hold to the hug hold.  He gives the wrap two thumbs up.  Cost-wise, two wraps will run you about the same as one real Moby Wrap if you use interlock. Jersey is cheaper.  Coupons are a good thing.  Sales are a good thing.  Too bad you can't usually combine the two at a fabric store.

Thursday, April 26, 2012

Glorious Green

The nursery project is still underway, though there are a couple of other things I've completed since my last posting.  I've been having too much fun with the baby.  Having a brood of three keeps me pretty busy, too.

The next change to the nursery was a pretty big one.  The walls are green now.  And I love them.  I was able to take my fabric to the paint store to find something that coordinates.  Thanks to a freak occurrence with our paint going bad during the home=building process, I was owed a free can of paint.  Woohoo!  That's a price I can afford.


I chose a green color that wouldn't be overwhelming.  I avoided yellow like the plague.  Several years ago I attended a teaching conference, including a class on color and how it affects people.  The presenter said that babies in yellow rooms tend to cry more.  Yeah, sign me up for that.  Sure.

Ever wondered what it looks like when a hippo paints a wall?  Now you know.
Even though I did paint prep on the houses we built and the Hubs did the painting on them, I still learned a lot from the process.  I learned things like using a paint roller rather than a sprayer still requires a bit more coverage with paper and tape than I thought.  There are still some spots of green on the ceiling I need to cover with white.  Speaking of green spots, it's always good to have a drop cloth, even if you don't think you need it.  There's a reason I had to buy Goo Gone for the carpet.  I also learned that it takes two coats of paint, even if you're sure you got plenty of paint on with the first coat.  Something else I should have known is that largely pregnant bodies take up quite a bit of space.  Did I back into a wet wall and leave a big fanny print in the paint?  Uh...no...of course not.  But don't ask the pants I was wearing.  They lie.


I am really happy with the finished product.  The color is both vibrant and inviting.  I'm super proud of the job I did, even if I do have touch ups to do on the ceiling.  There are tons of painting tips and tutorials to be found online.  If you want to tackle painting a room it's good to watch a lot of them...and actually use the tips.


The color I used was Lemon Thyme from Kwal.  It's a bit warmer color than I would usually choose but it goes with the nursery fabric.  Turns out that a gallon of paint was exactly how much I needed to get two coats of paint.  I have just enough left to do touch-ups.


This wall and the dresser need more work to make the space more visually appealing.  I'm trying to figure out what I can do with some art of pictures.  We'll see.  I do have one favorite addition to the nursery.  With this little guy in there how can anyone notice anything else?

Cute little man.  He makes me give out happy sighs.
If I get really ambitious I'll make some more things with the fabric I have. The plan is to do just that and keep the nursery free. However, I have already spent some money on it. The part that costs is something I haven't put up yet...

Thursday, April 12, 2012

My New Arrival

Here's a quick picture of my newest little project.  His birth went well and I've been enjoying the cuddle time.  Now I just need to figure out where to find the time to shower. :)

Saturday, March 31, 2012

Valance

There was more fabric leftover from the crib bedding than I anticipated.  Woohoo; bonus valance!  I liked the crib skirt so well that I decided I would use the same design for a valance.  There were just a couple of modifications I wanted to make.

Finished valance
First off was making the valance shorter and wider to get the look I wanted in the window.  I kept the orange strip at the same length as the bed skirt.  The animal print and the blue both got a couple of inches knocked off.   Then I had to accommodate the window width.  It's just under 48 inches wide.  I also thought I'd try smaller picots.  I'm not sure which one I prefer, but it doesn't matter because it's already made.  :)

The other, bigger problem was what to do with the valance in terms of how to use it with the plastic valance that came with our blinds.  A curtain rod would either cut off view of the plastic valance or not fit underneath it. Then I remembered that the plastic valance is, in fact, made with plastic (brilliant, no?).  A little hot glue would stick the fabric on well and not cause damage when I'm ready to take it down. Double score!
Marking center on both plastic and fabric valances

Once I put it up on the window it was clear that I had overlooked one very important part: lining.  It was really noticeable when I put it up and the light was shining through the seam allowances.  There are plenty of them because I was using remnants as much as possible, rather than cutting into the larger bits of fabric.  I had no desire to take down what I'd already glued on and decided to just glue the lining on to the valance.  Besides, hand stitching it on would have taken more time than I was willing to spend.  That plan would have worked well if I hadn't run out of glue sticks.  I have two glue guns, a standard size and a mini size.  I was only able to find the mini gun and the standard sticks.  The rest is somewhere in the pile of packed boxes in the basement.  Of course.  I did find some self-stick Velcro strips and felt pretty clever for using that to attach the lining to the back.  At least, I felt clever until it became apparent that the adhesive was designed to be just strong enough to hold the Velcro in place until it can be stitched down, which I hadn't planned to do.  In the end I hand stitched the lining while watching TV.  Is it just me, or does it seem like all my best laid plans for this nursery keep falling through?

The Hubs holding up the valance because I'm not ready to snap it back in place just yet.  He's a good helper.
Sorry for the flash on the picture.  I just really wanted to get this posted.  The seams still show up on the orange when using a flash.  Interesting.  Anyhow, next up in the great nursery transformation is a bit more color. :)  I have the feeling I'm going to love this.

Tuesday, March 27, 2012

Crib Bedding


I finished the crib bedding today.  Yeehaw!  (I just moved into a rural area so I've got to get used to speaking like the natives, right?)  The crib sheet and skirt are all done and even placed in the crib.  Maybe that shouldn't make me overly proud, but I'll take any accomplishment I can get when I'm as roundly pregnant as I am at the moment.
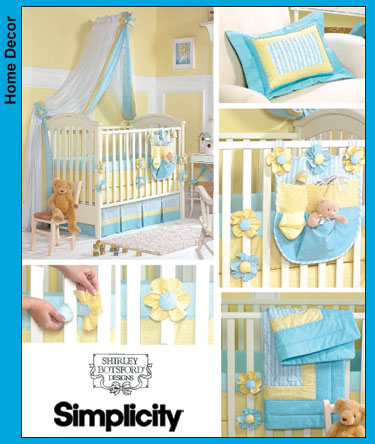
Picture from sewingreview.pattern.com
I'm extra pleased that they fit into my $0 budget for the nursery.  There's still more I want to make (curtain, diaper stacker, possibly cover a lampshade, etc.) but I'm happy to have the essentials done.  All he really needs is the sheet to sleep on so I'm doing well to also have the skirt done.

For the  bedding pattern I kind of merged the one I used for my daughter (Simplicity 3795) with the one from Amy Butler's book Little Stitches for Little Ones.  (follow the link and if you click on "First Pages" after you click on Look Inside! and continue clicking through you'll find a picture of the set.  Sorry, that's the best I can do for a picture)  From Amy Butler I used the basic measurements for the sheet and crib skirt sizes, as well as using panels rather than large pleats.  From the Simplicity pattern I used width measurements for the three different  fabrics to be used for the crib skirt.  I'm completely skipping out on the bumpers pads because 1) they were more trouble than they're worth last time around, 2) darling as they are, SIDS stats are increased with using them, and 3) my second daughter slept with her face pressed into her crib bumper and we ended up just taking it out of the crib, anyway.

The big challenge with the crib sheet was lack of yardage.  I wanted to use the print with larger animals but there simply wasn't enough yardage (or was it width?).  Instead of deciding which other fabric I wanted to use I just took the measurements for side panels straight from the book and made them from the coordinating yellow fabric.  I thought I was brilliant until I saw that there are companies selling crib sheets this way so parents can avoid putting bumpers in the crib.  Ah, well.

My big surprise came as I was deciding which fabric to use on the crib skirt.  The surprise was the choice to use the printed side of the blue fabric.  I'm not usually a fan of mixing lots of prints, but it just looked a whole lot better to use the printed side.  So I did.
See?  Much better.
The next problem (in my mind) was that I wanted a little more embellishment for the crib skirt.  To me that is the show piece of a bedding set, particularly when bumpers aren't being used.  But embellishment would mean I'd have to spend money.  Dang it.  I decided to bite the bullet and purchase some jumbo rick-rack when I got my little stroke of brilliance.  The darker yellow color I had from leftovers didn't have a lot of yardage, but you don't need a lot to make picots.  I love picots and knew they would make a great addition...especially without needing to purchase anything.

Someday I will learn to take good pictures that all have the same light.
Just a little embellishment can take a project from kinda-cute to darling.  I'm really a fan of the picot trim.  I also like that it feels bolder and more masculine than rick-rack.  But that's just me.  I hated myself for choosing to make picots while I was in the process of cutting, pressing and sewing them.  However, as is my usual, once I got them on the crib skirt I was happy I'd done it.

Finished product being stepped on by daughter #2, aka The Pink Blur
Once I put the crib skirt on the I realized that most of the picots are covered by the bar across the bottom.  Bother.  One would think I might have planned for that.  I blame pregnant brain.  At least it should fix itself when we drop the mattress down to the next height.

I'll clean out under there before baby is born...maybe.
If I feel really ambitious I could make little animals to attach to the crib rails in place of the flowers on the pattern I used before.  I certainly remember making all those flowers.  Oh, so very many flowers.  I think making those was enough to give me arthritis all by itself.  But they were charming and I wasn't sorry.

Overall, this project isn't as scary or irritating when the bumpers are left out.  I highly recommend skipping them for the sake of your sanity.  I have other pictures and things to use for a tutorial if anyone is interested.